
Get Attention With a Single Tap, with Lock Screen Widgets and Focus Modes
Lock Screen Widgets can help you get attention with a single tap!
Signals for HomeKit has had flexible Widget support on iOS and iPadOS since the beginning, and now with iOS 16, it supports Lock Screen Widgets - combined with Focus Modes this is a powerful combination to get attention with a single tap. Let’s dive in!
The Goal
Focus Modes are a way to customize your iPhone’s notifications, Lock Screen and Home Screen for certain activities - in this case, well create custom Widgets for our Work Focus Mode that makes it simple to run you’re ‘Meeting Time’ and ‘Meeting’s Over’ Signals with a single tap!

Let your family know that you’re in a meeting with a single tap!
What you’ll need:
Two Signals
‘Meeting Time’, which will flash the lights outside your office red, and keep them red. You can use the Signal from this article to get you started
‘Meeting’s Over’, which will flash your lights green, before turning them white, and then off. We’ll leave this as an exercise for you to create and customize.
An iPhone with iOS 16, and a ‘Work’ Focus Mode. If you haven’t modified your Focus Modes yet, you’re in luck — iOS 16 includes this already!
… that’s it!
Create your Widgets
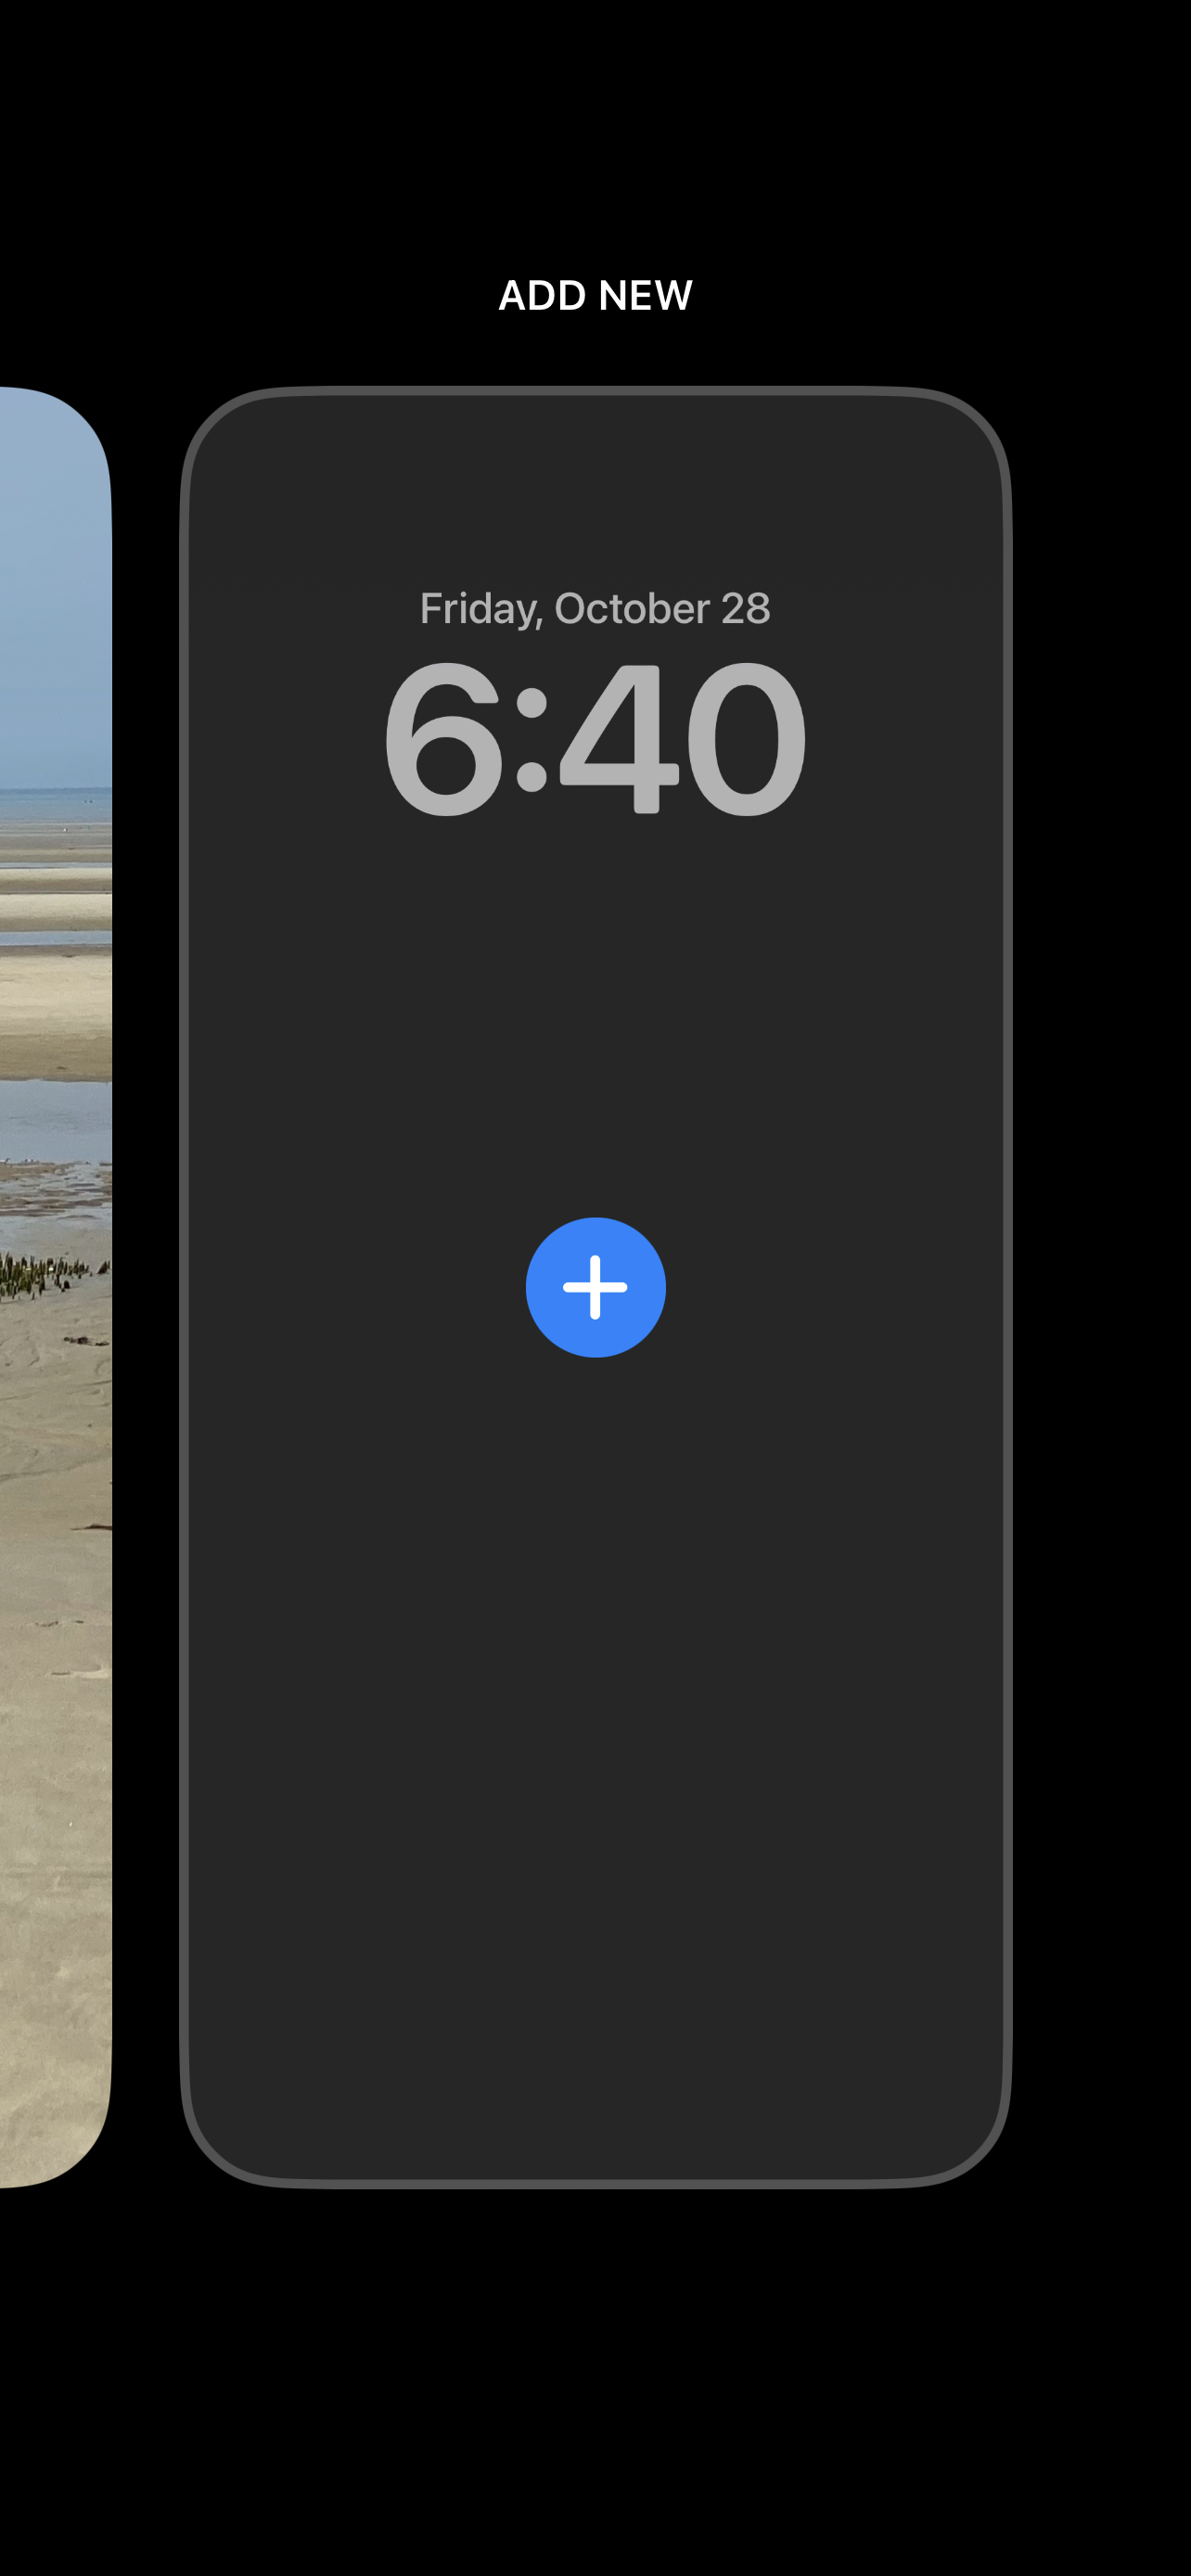
There are a few ways to get to the Lock Screen customization, but the simplest is to actually lock your phone, and then tap the screen so you looking at the Lock Screen itself. Tap and hold on the background of the screen, and after a short wait, you’ll be presented with a ‘picker’ to choose your Lock Screen. Scroll all the way to the right to find the ‘Add New’ option, and tap the ‘+’ button.
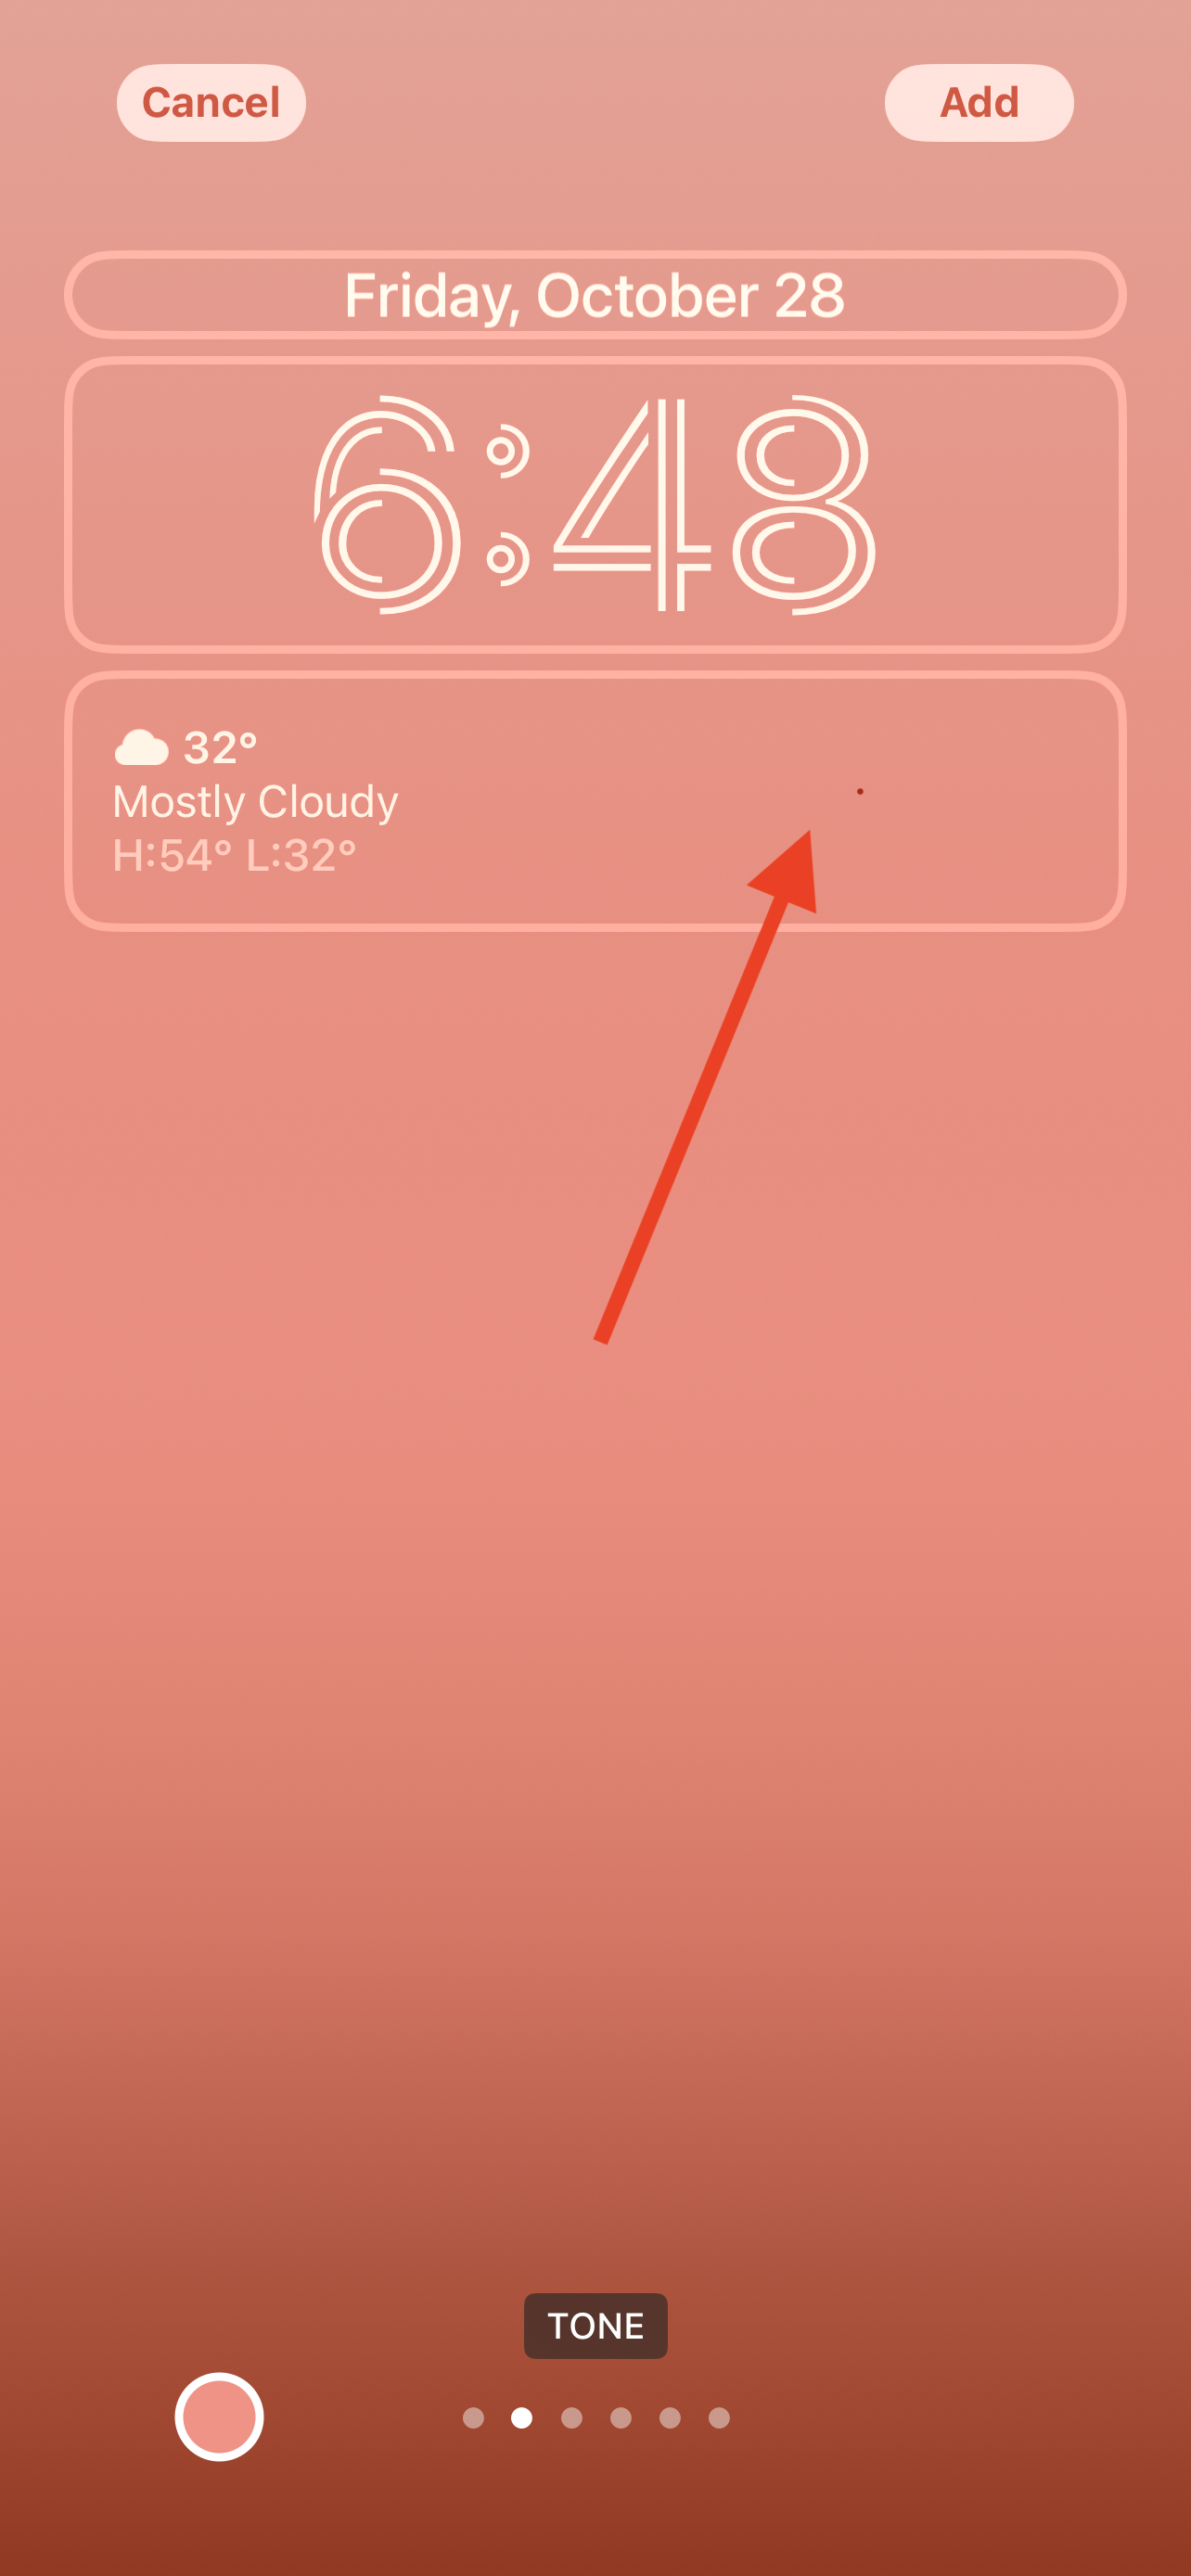
From here, you can choose from an impressive number of options. Given that this is for ‘Work’, we’ll go with a simple Color option — something not distracting, and that will remind us what we’re supposed to be doing whenever we pick up our phone.
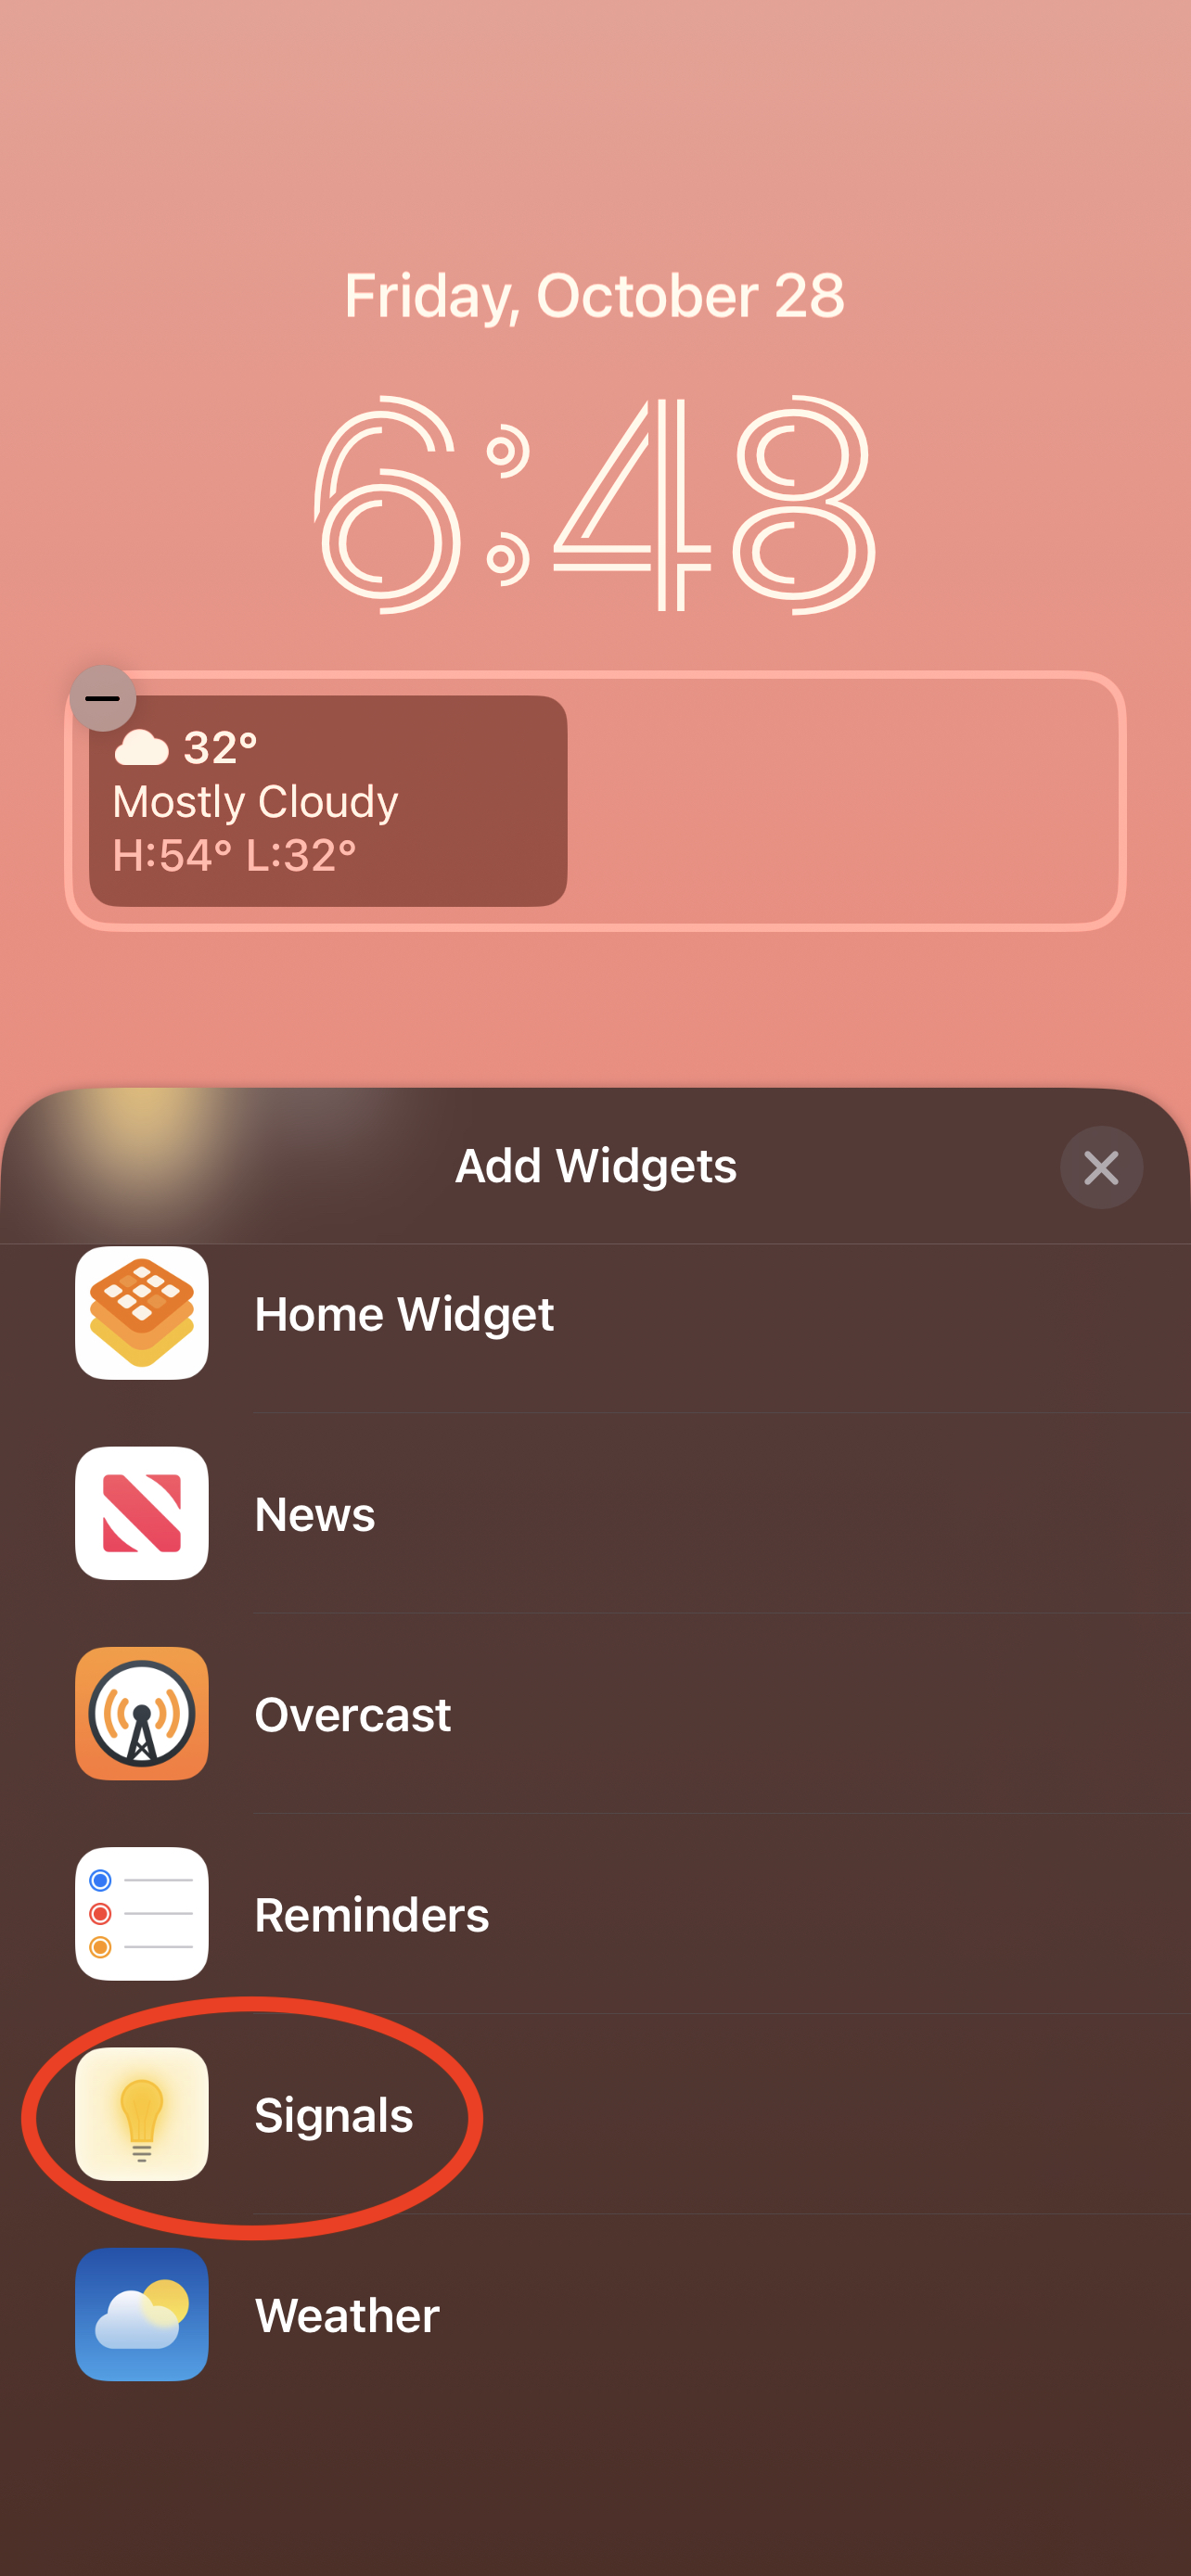
Once the style is selected, you’re ready to customize. You can add Widgets both to the single row beneath the clock, and also to the date line above it - we’ll walk through both here. Start by clicking anywhere in the row beneath the clock, to get a list of available apps that support Lock Screen widgets, scroll down to find Signals and tap it.
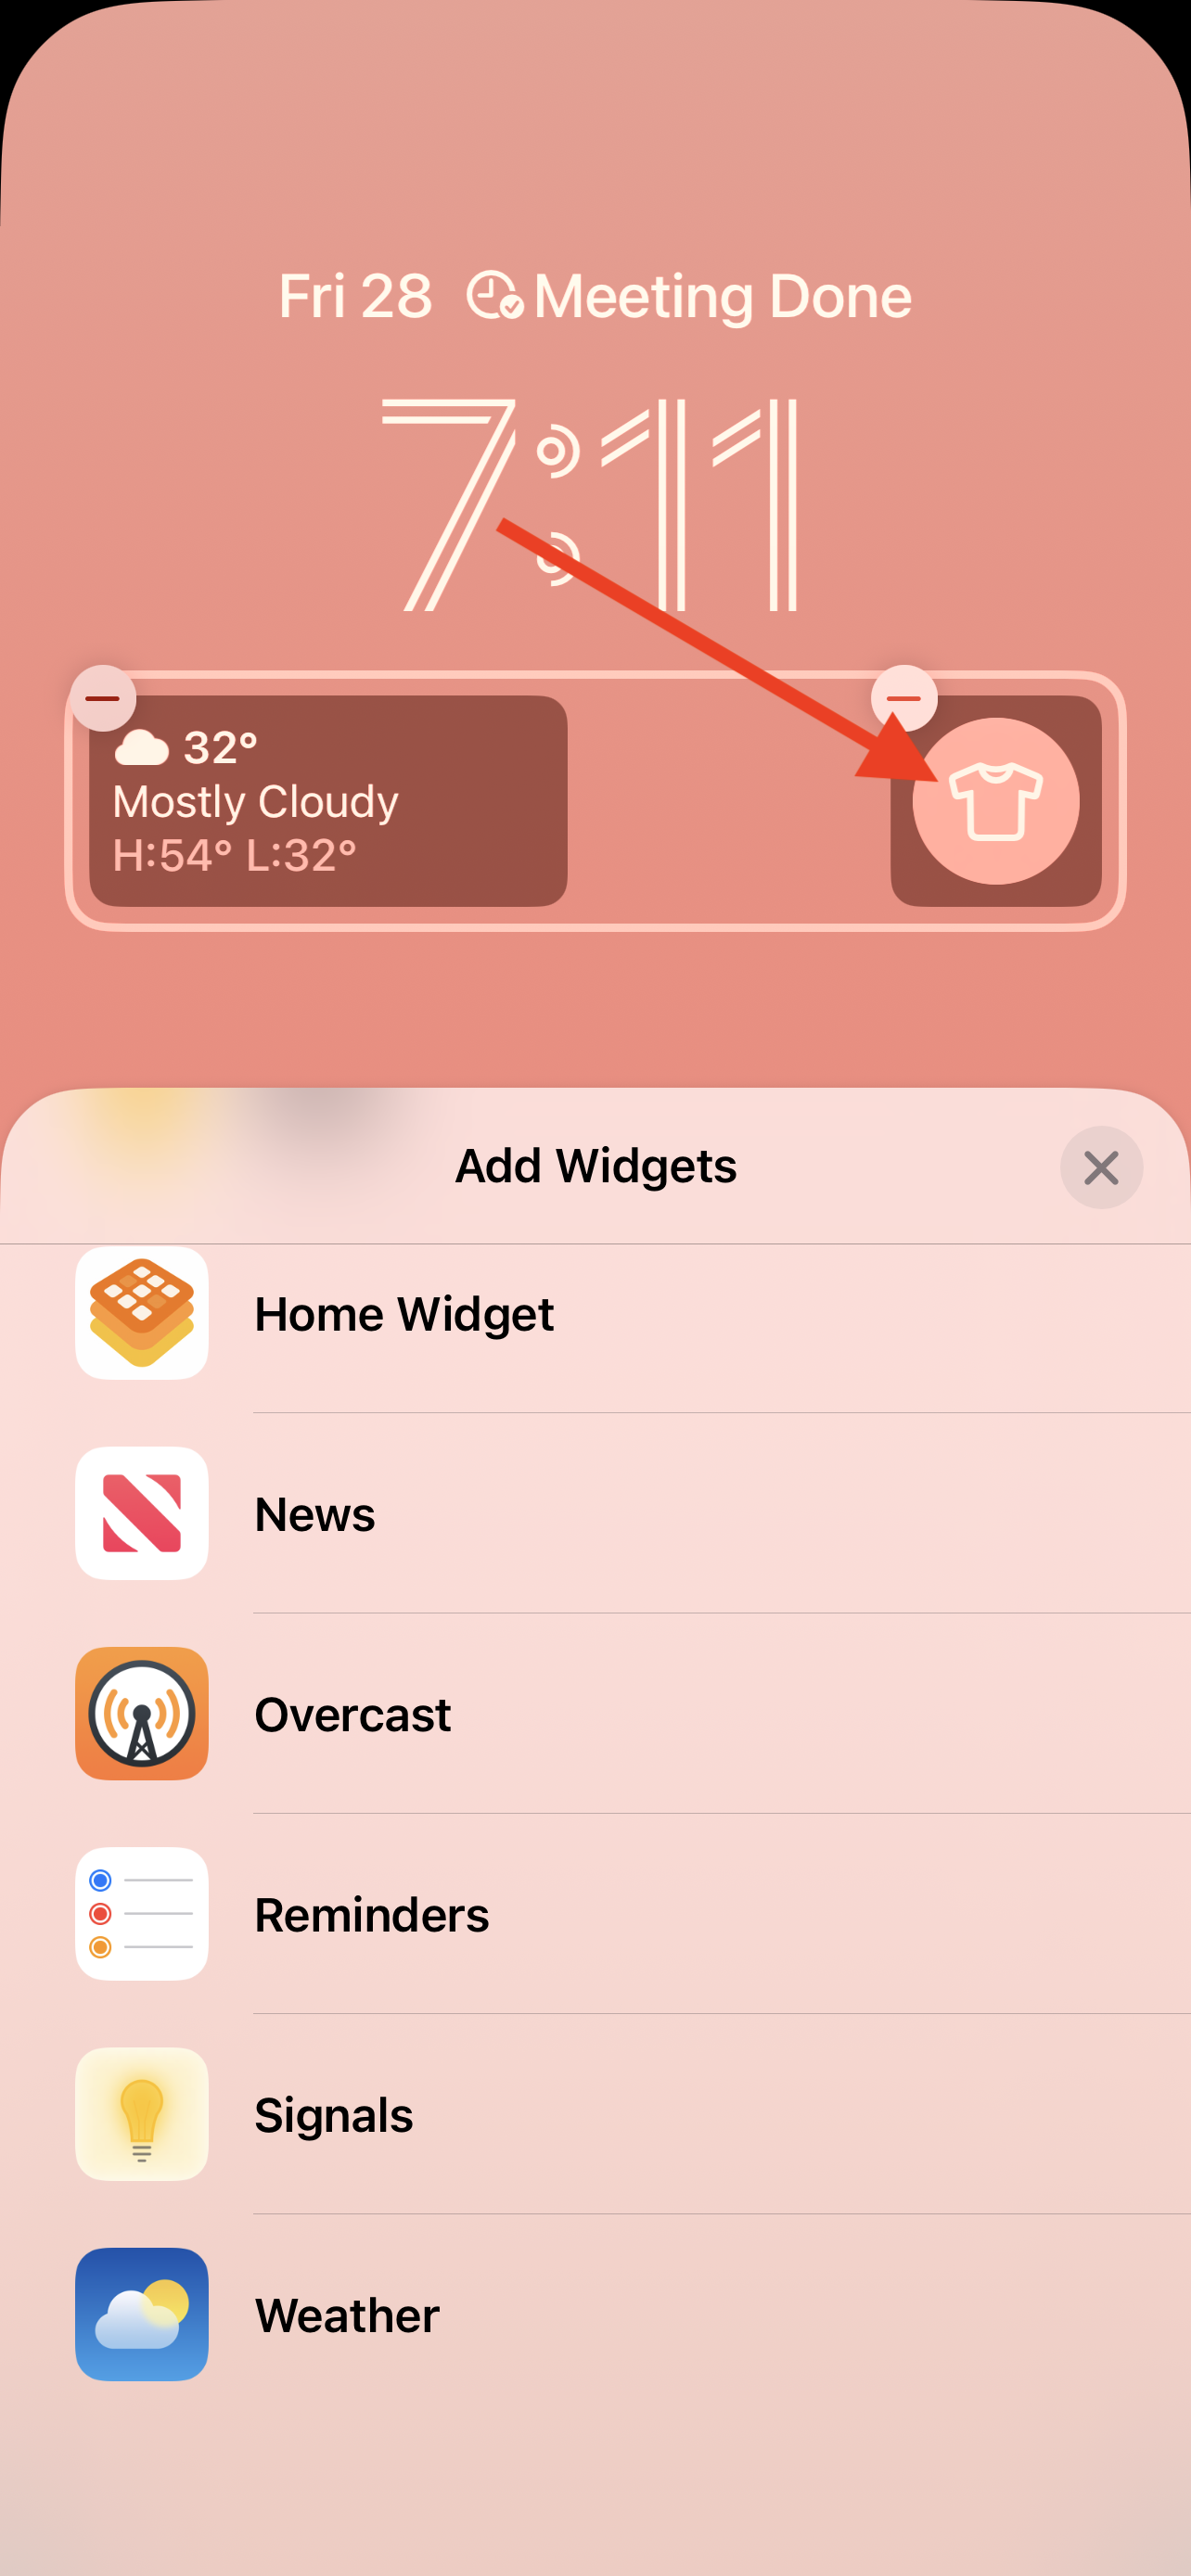
This will add the Signals Widget to your Lock Screen, but hold on… you didn’t get a chance to pick the Signal you want — what gives? This part isn’t immediately obvious, but if you now tap on the newly created Widget, you’ll be presented with the configuration sheet, so you can pick the Signal you really want here. For now, we’ll select our ‘Meeting Time’ Signal.
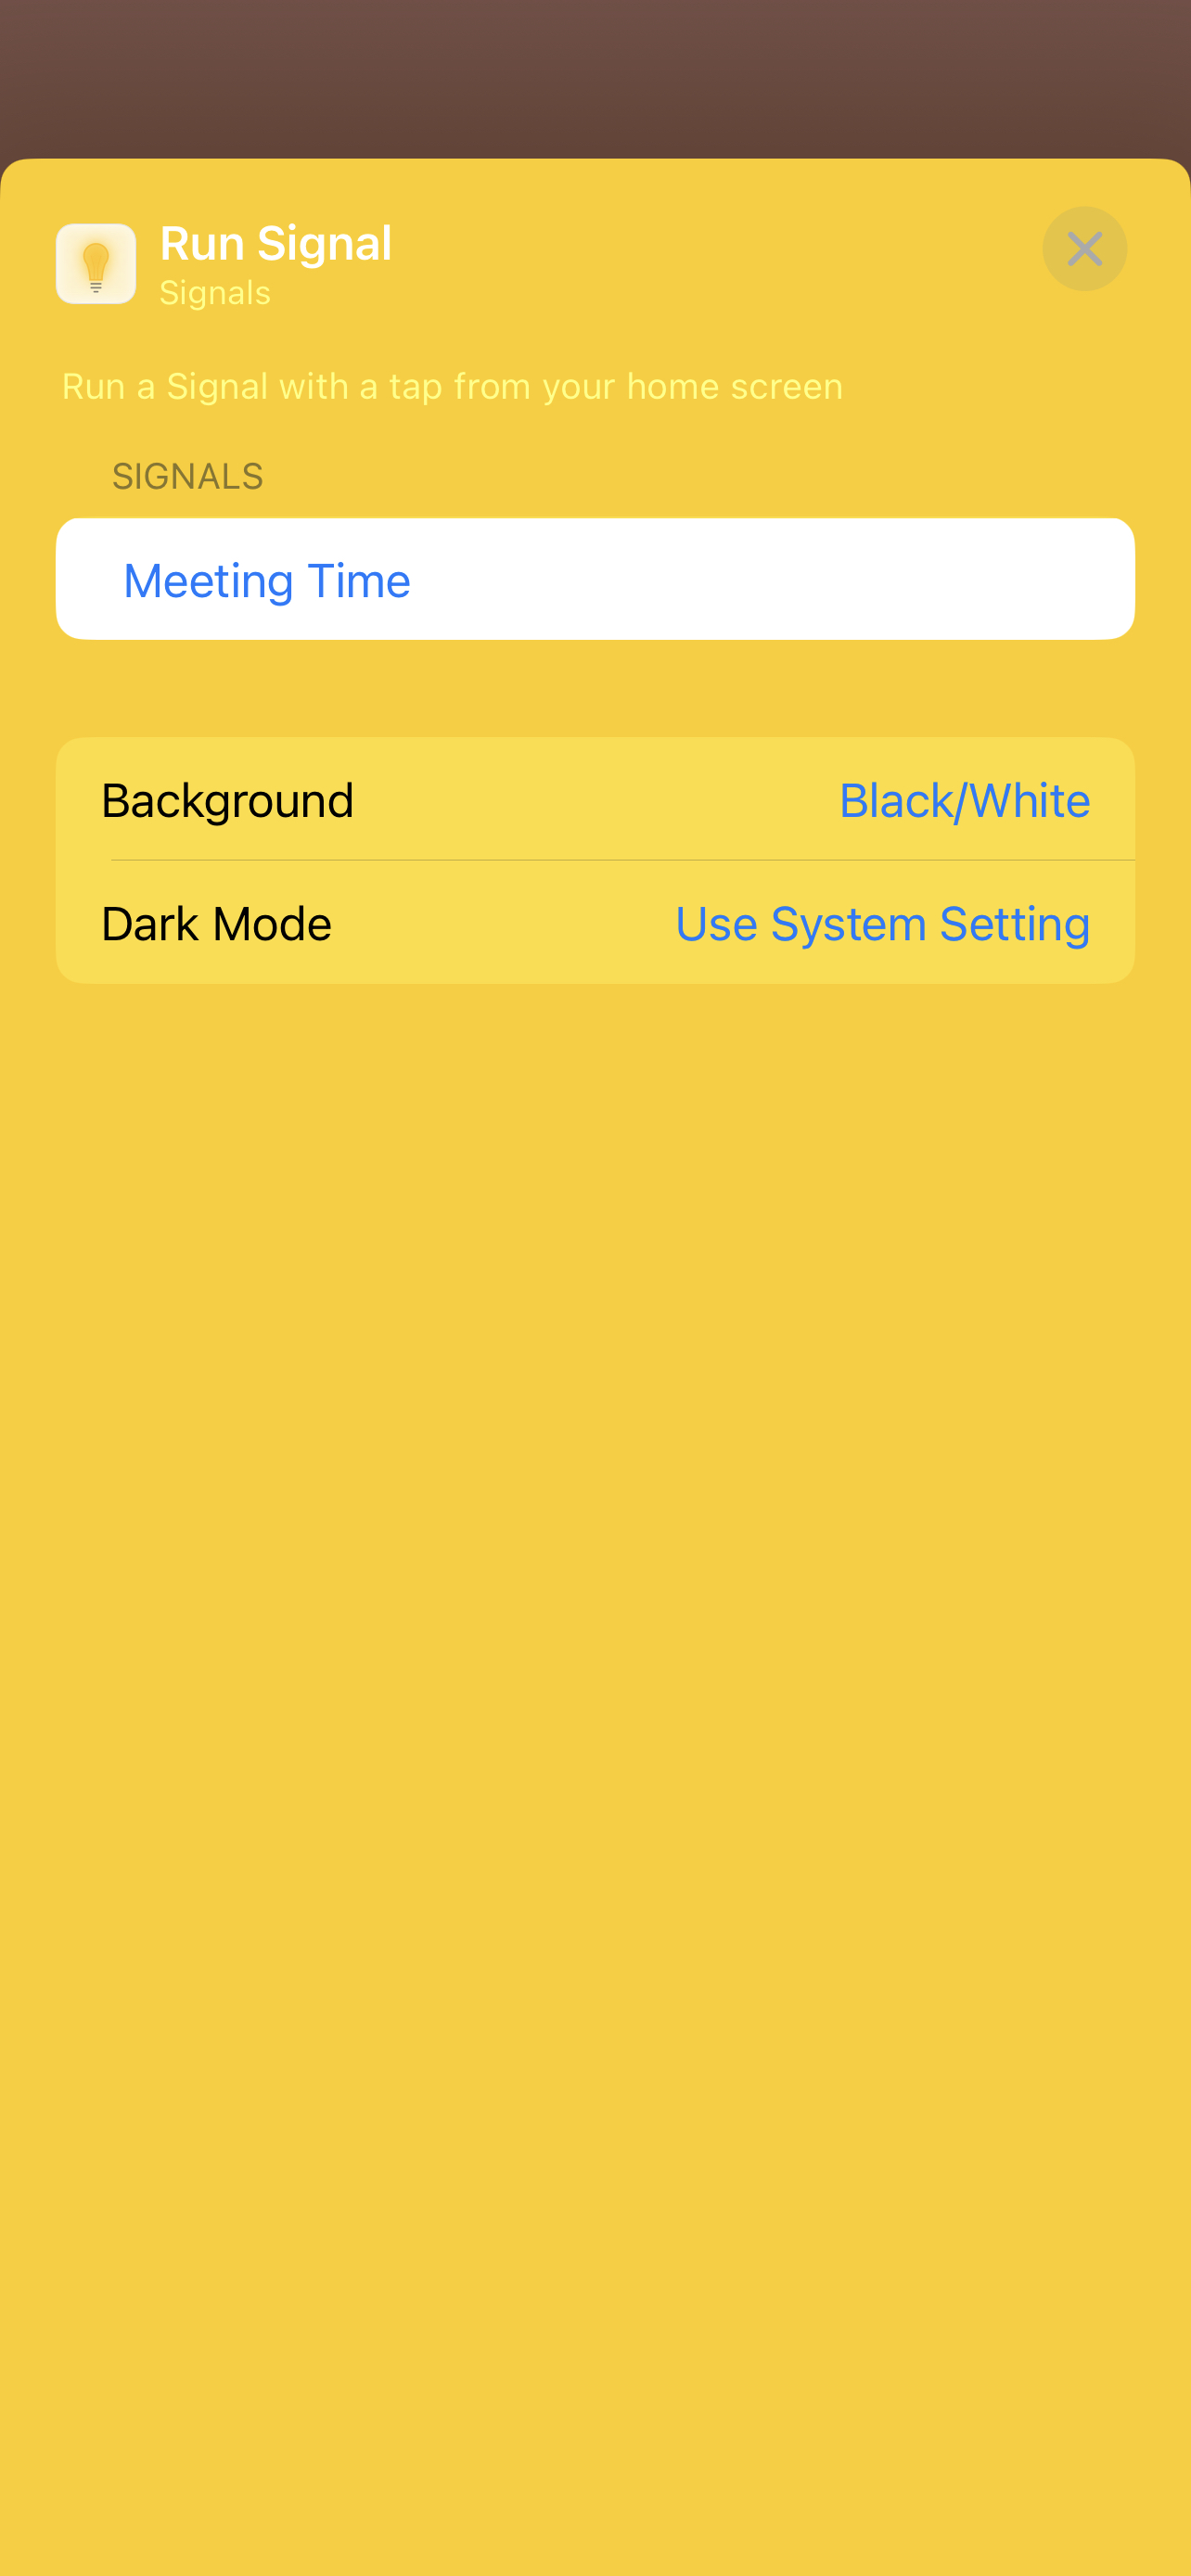
Before we leave the Lock Screen config screen, let’s create a second Widget in the date section. Just as before, you’ll tap the date section to be presented with a list of Widgets that are supported here, and then tap the newly created Widget again to configure our ‘Meeting Done’ Shortcut.
Customize the Lock Screen for Work
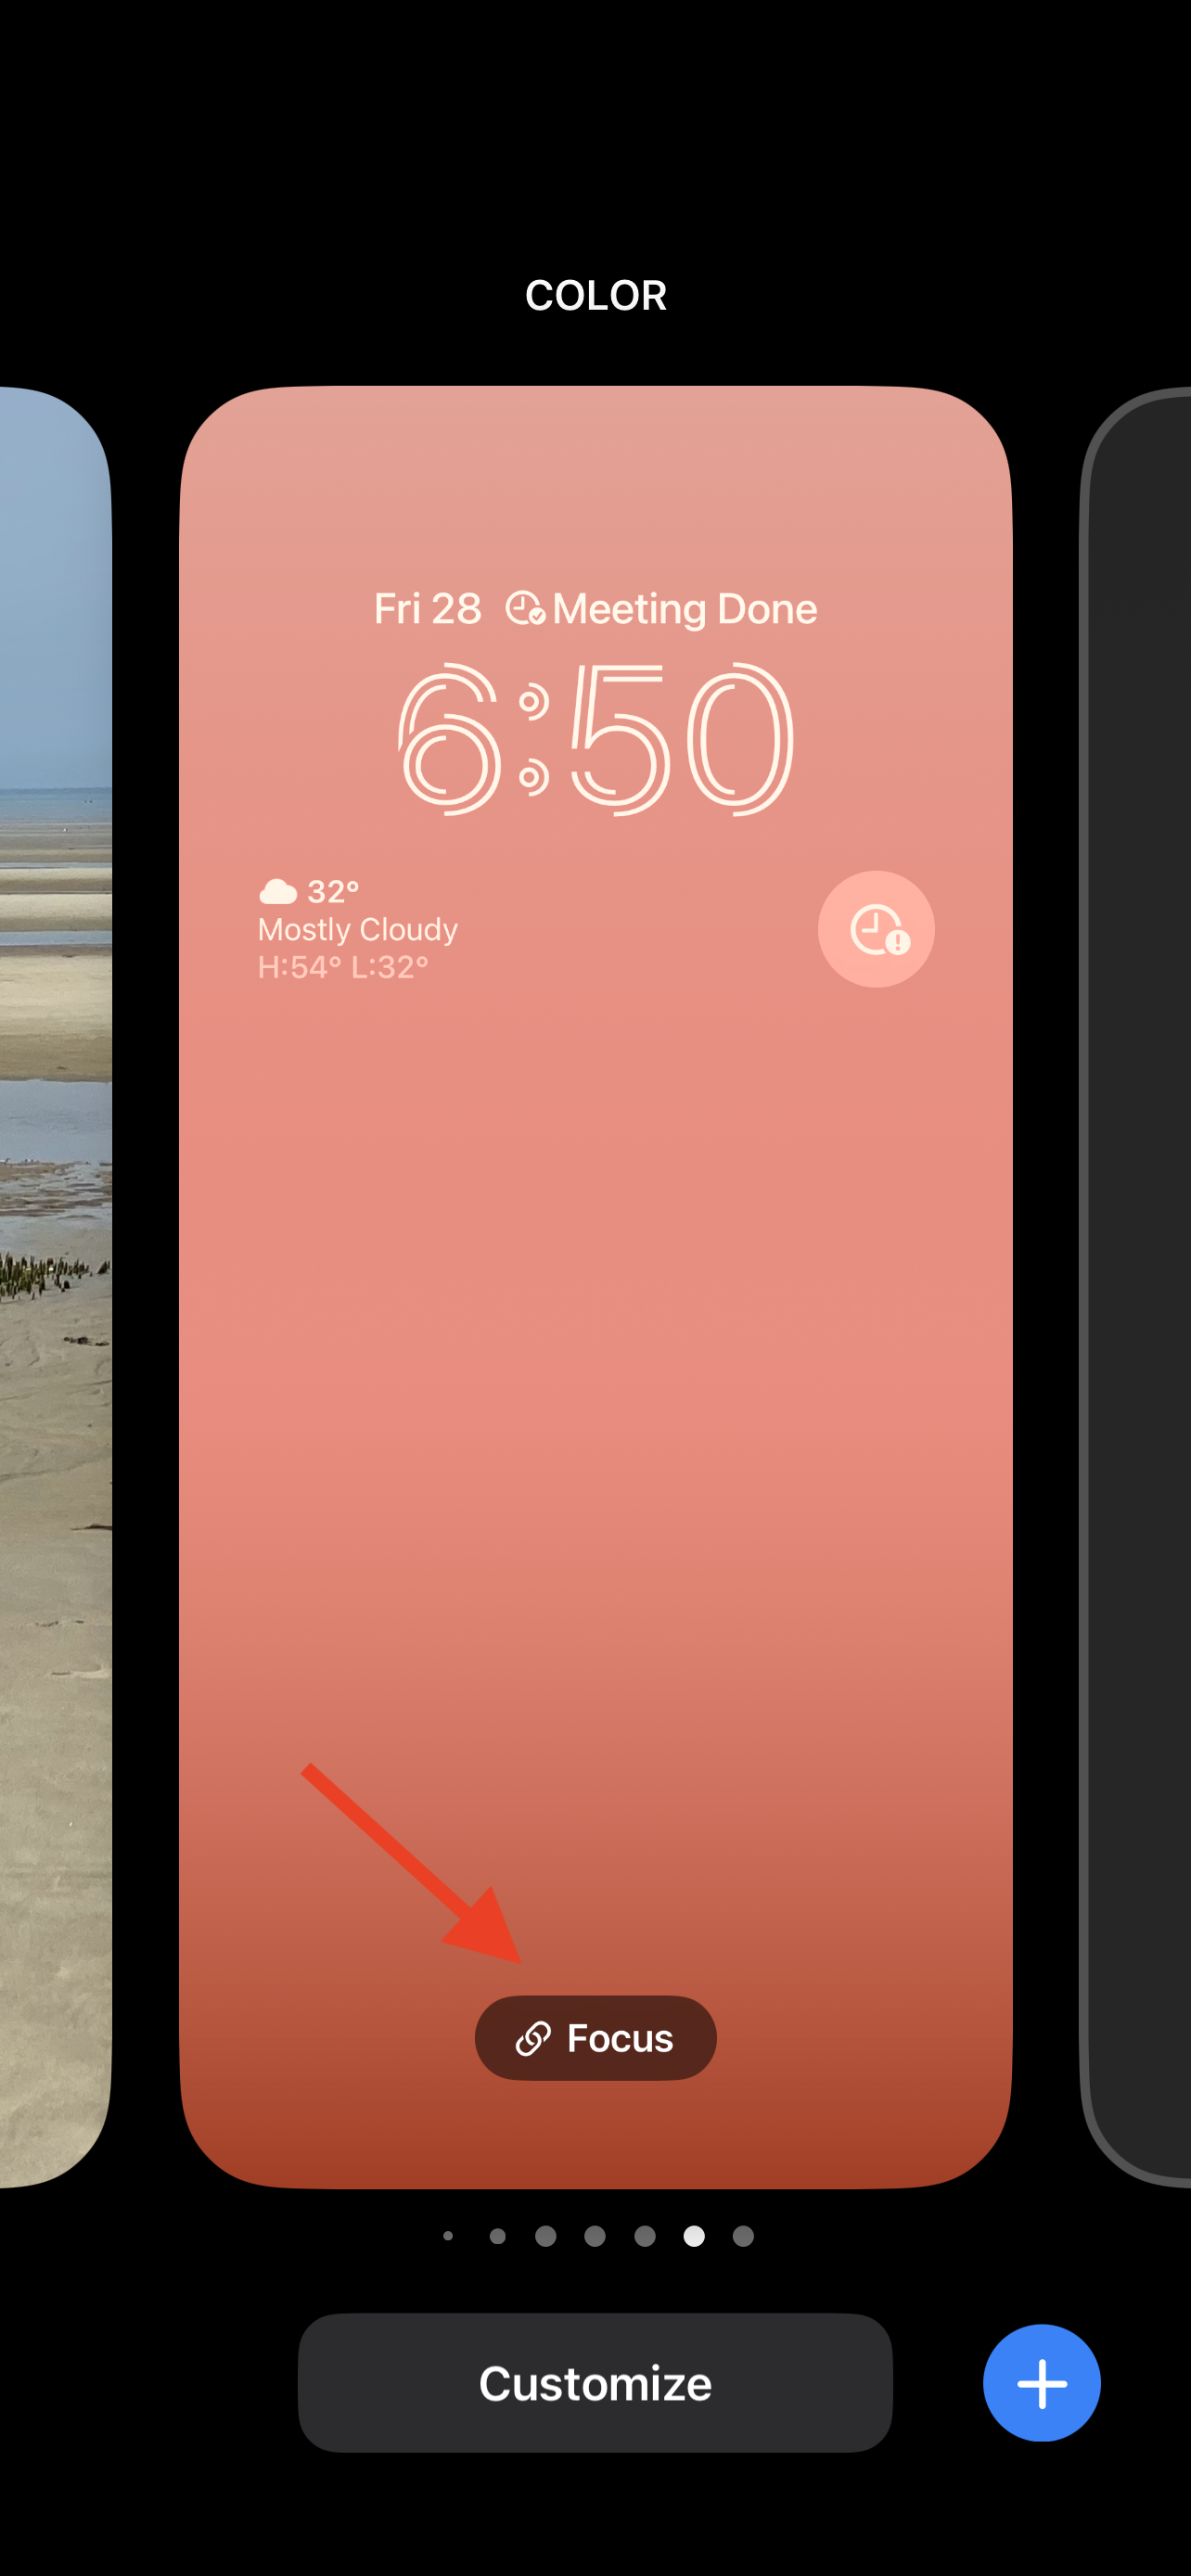
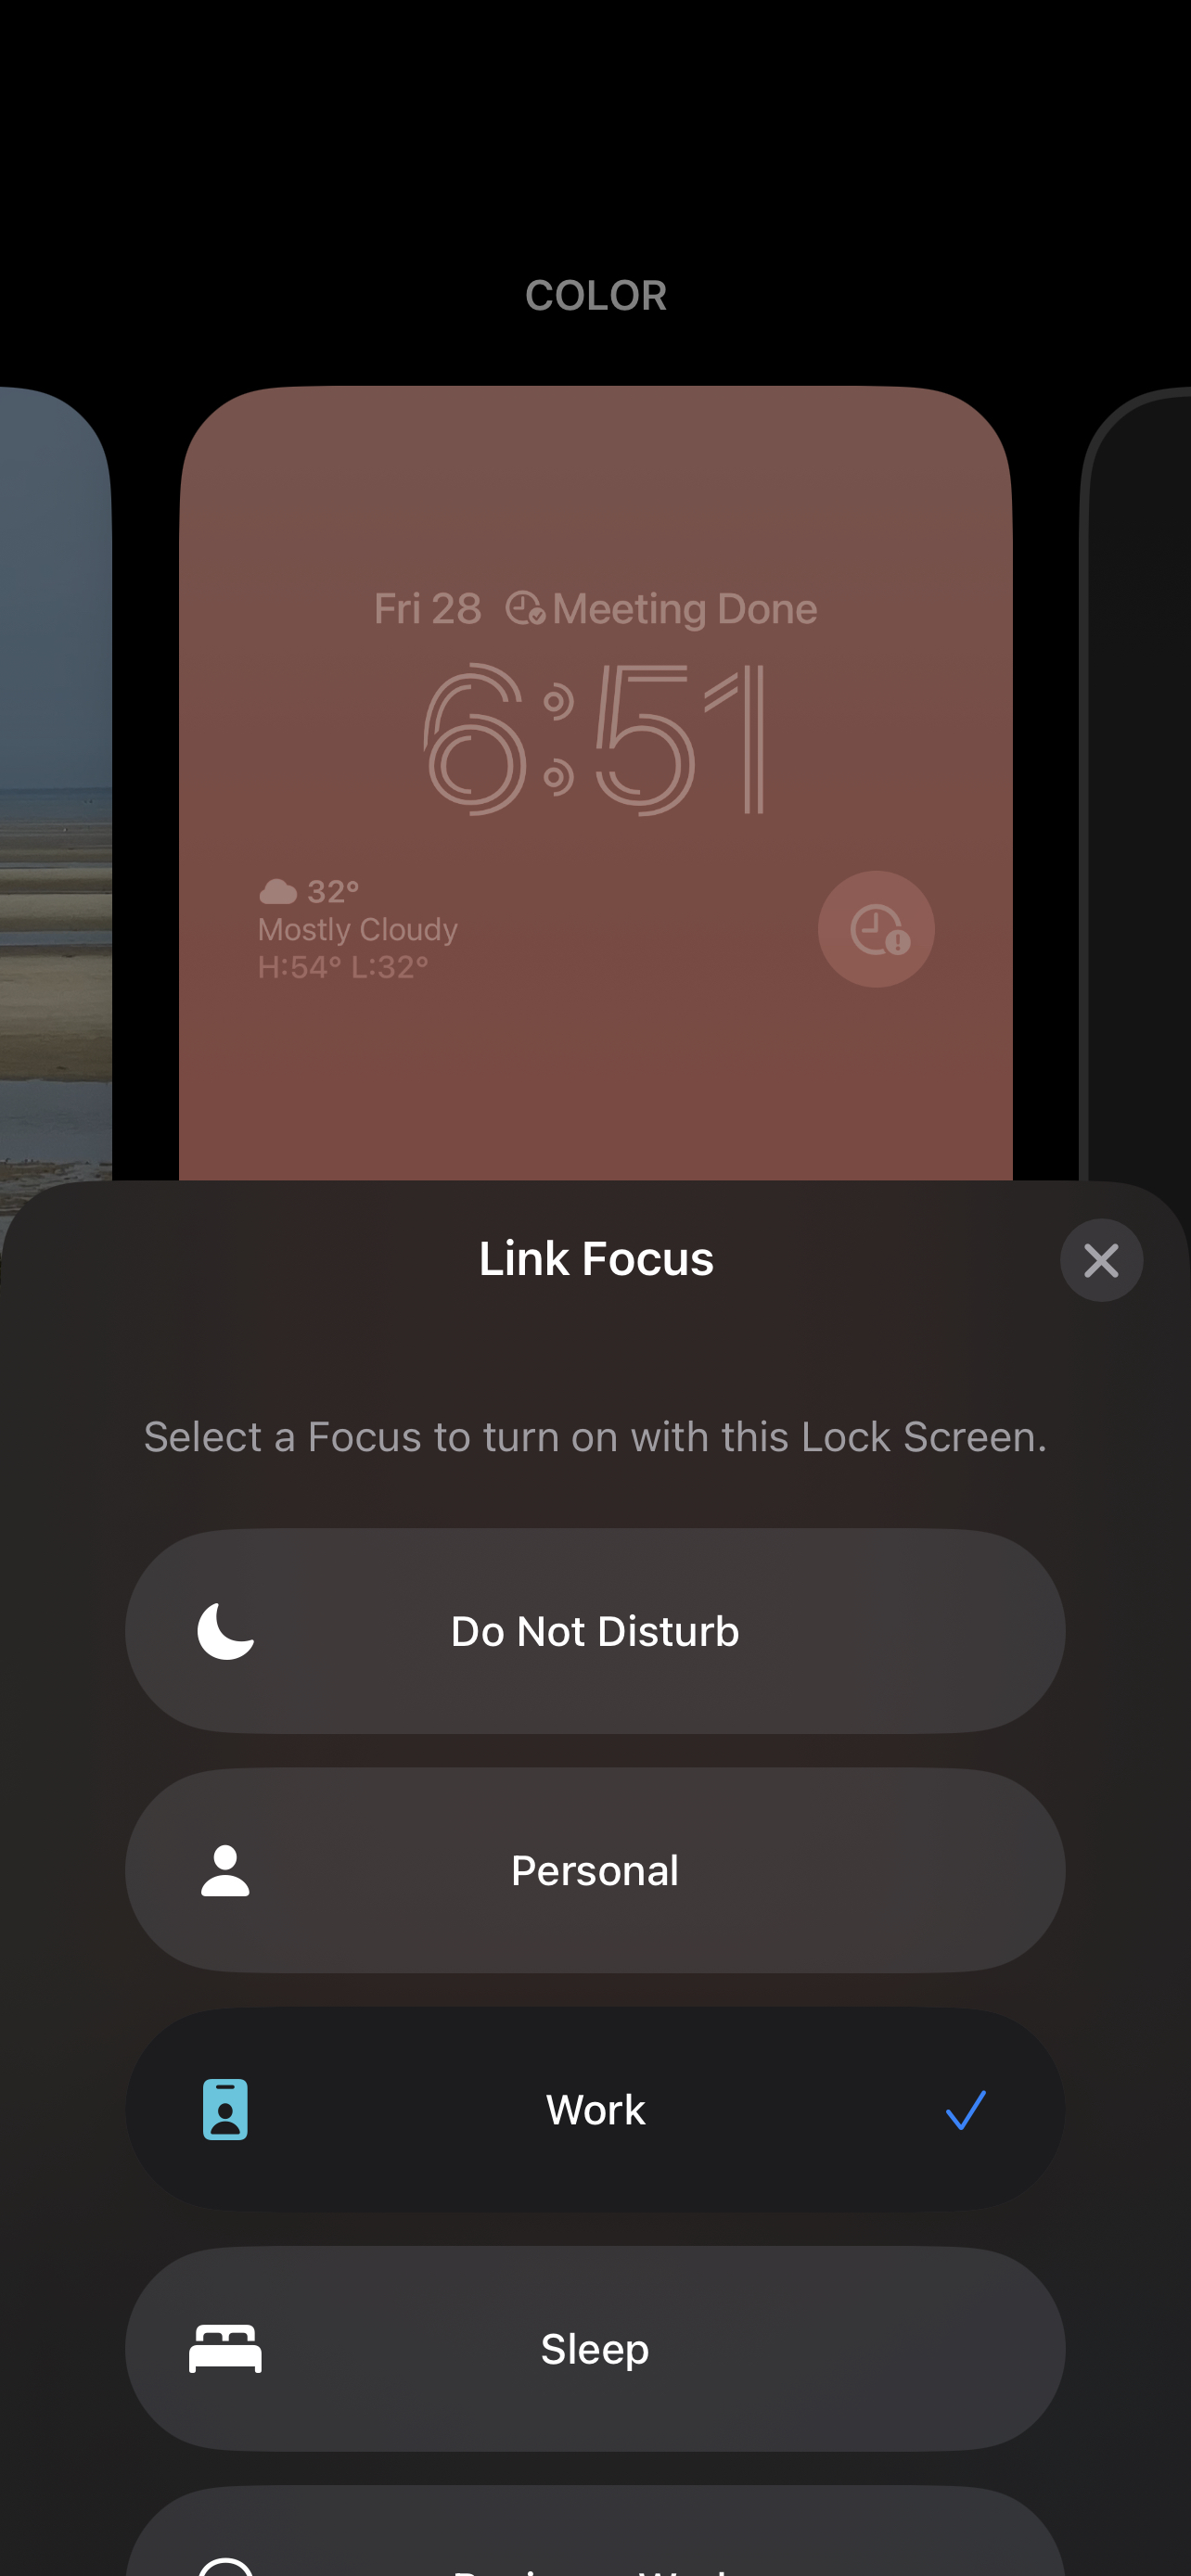
The Lock Screen looks great, but now we need to make sure it’s displayed each time we enter our Work Focus Mode. Return to the Lock Screen selection mode, you can tap on the ‘Focus’ button down at the bottom to display a list of your Focus Modes. Select ‘Work’ here, and you’re done!
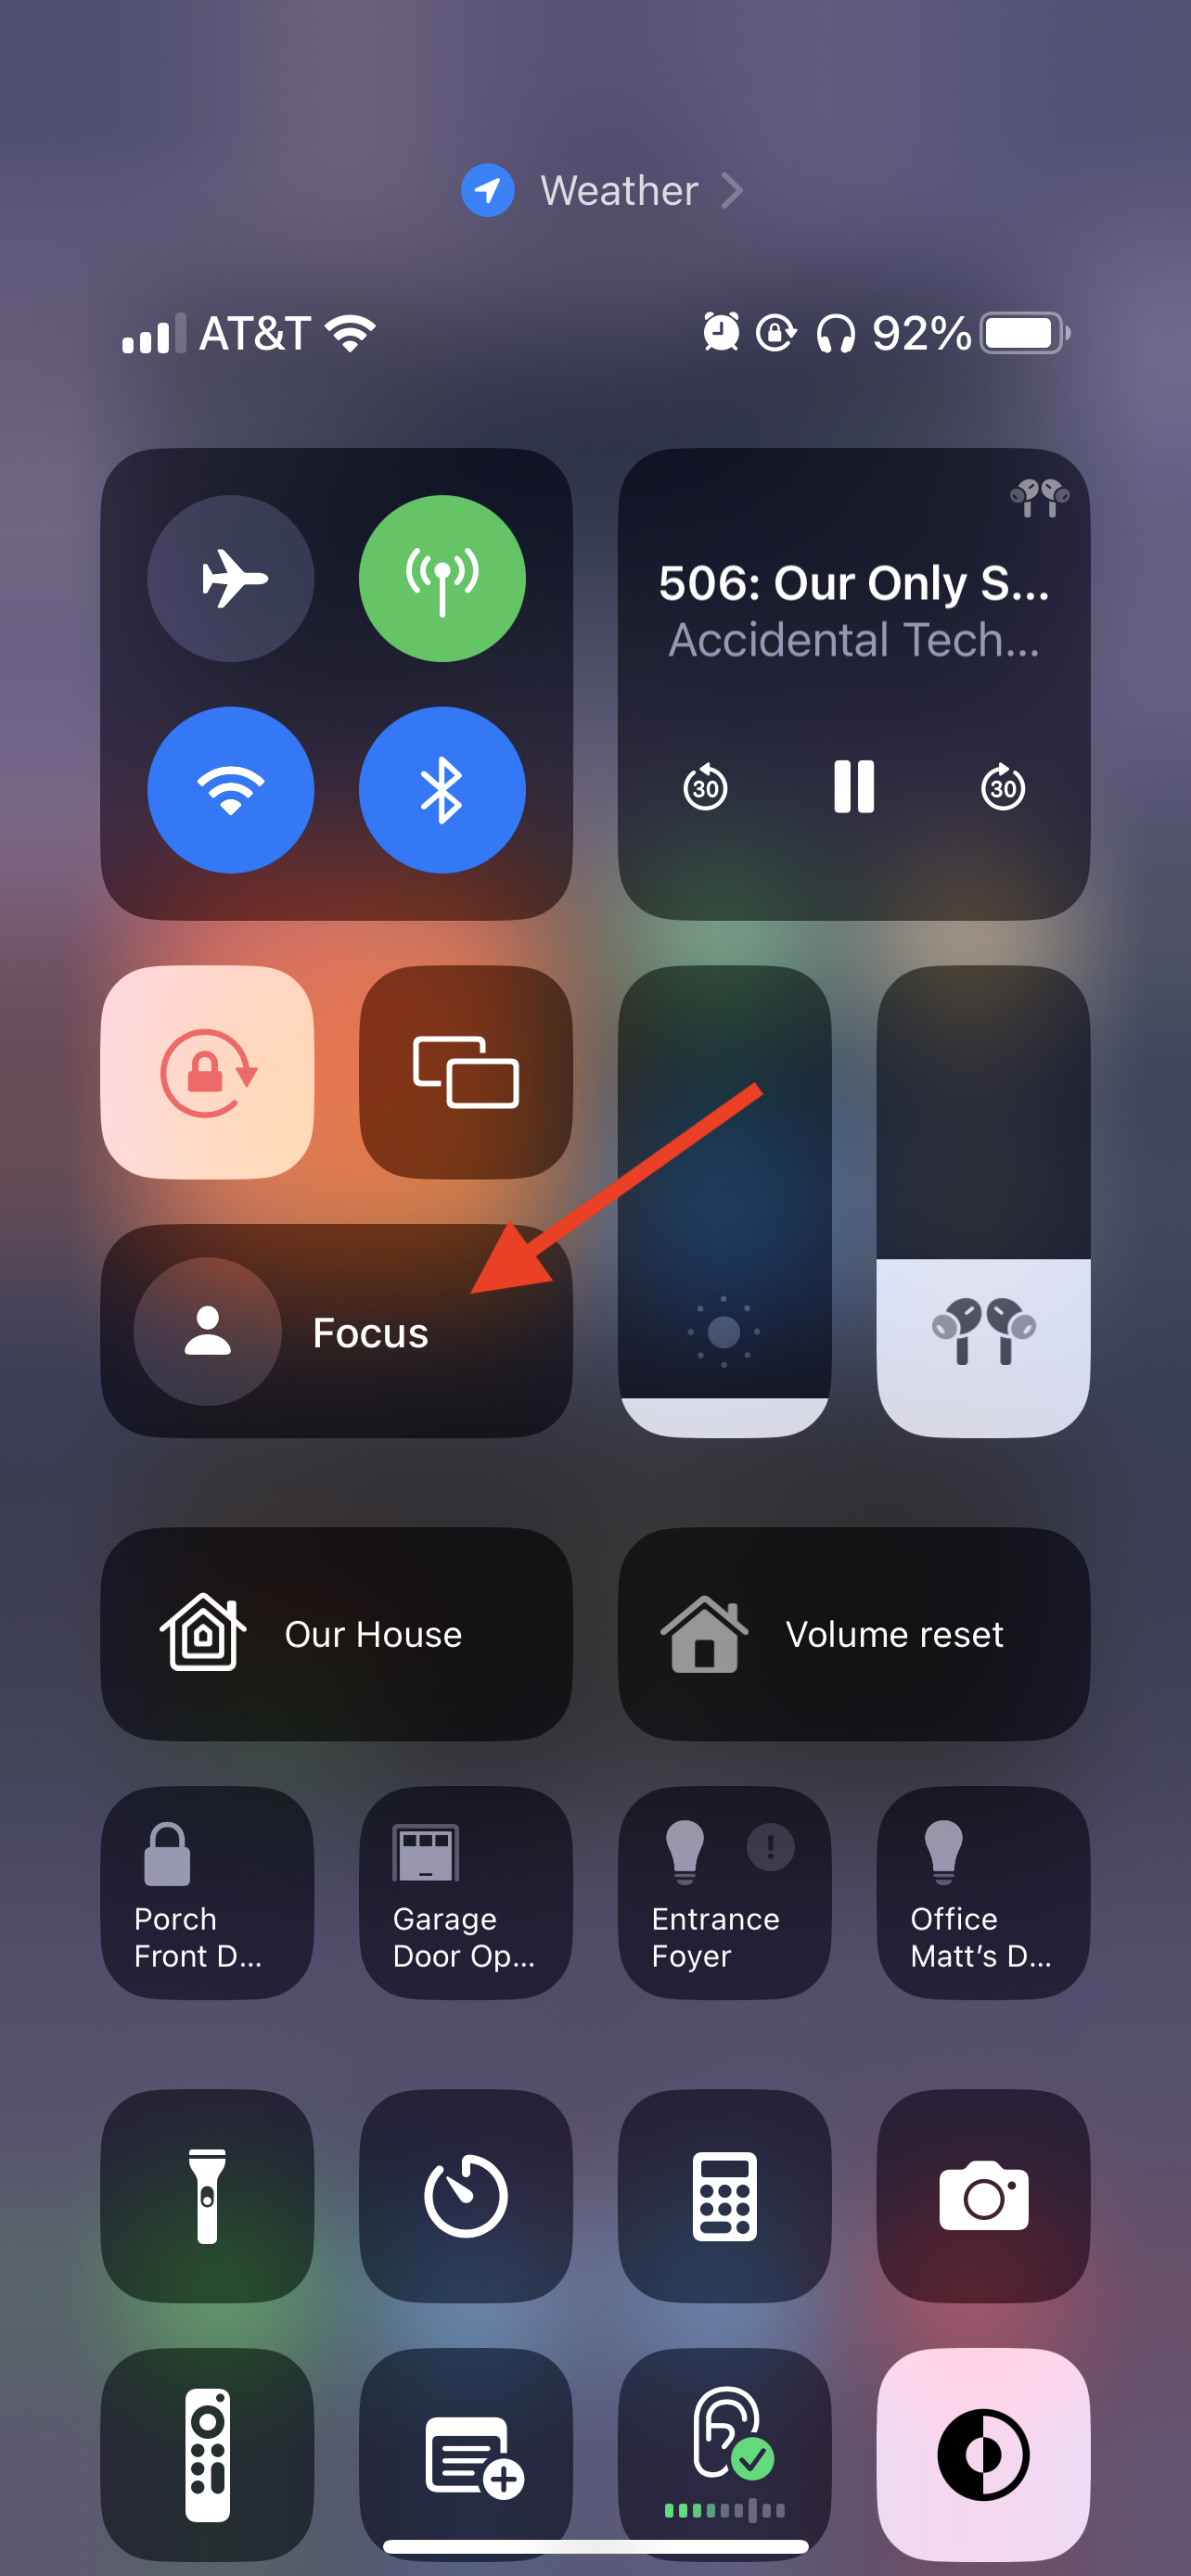
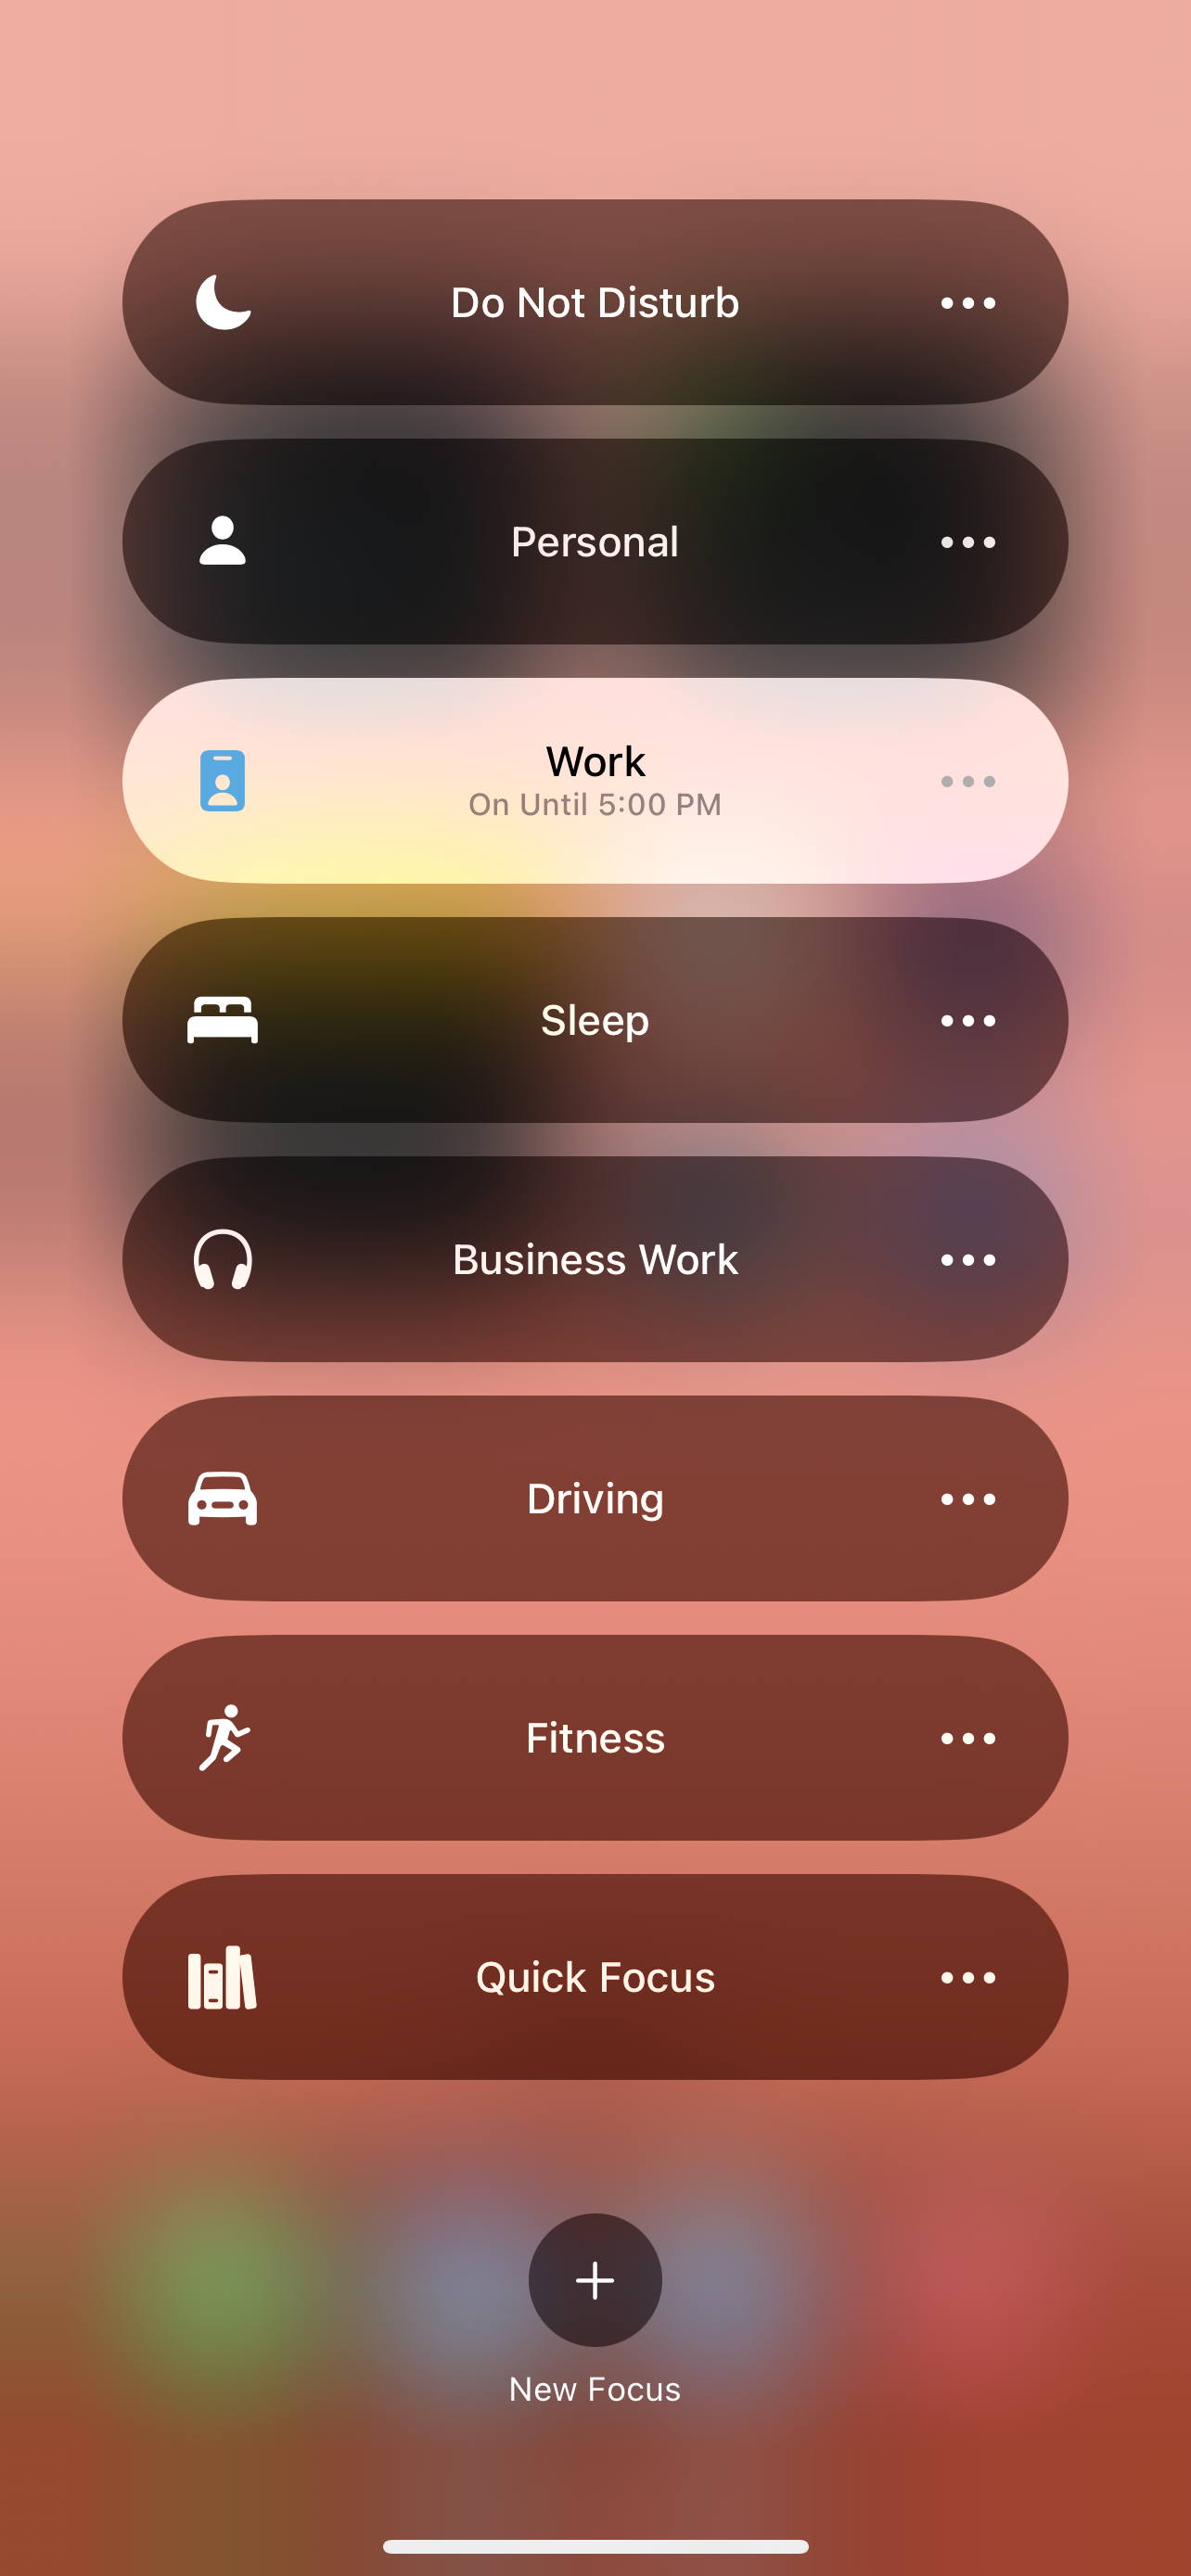
Turning on your Focus Modes is now as simple as swiping down from the top right corner of your iPhone to open the Control Center, taping the ‘Focus’ tile (make sure to tap the right-hand side of the tile, otherwise you’ll enter a generic ‘Do Not Disturb’ mode), and then selecting ‘Work’ in the following screen.
More on Focus Modes, and… a challenge!
If you haven’t experimented with Focus Modes, I really encourage you to explore further — they are a super powerful way to customize your iPhone experience for the tasks you do most often. Not only can you customize your Lock Screen, but you can select custom Home Screens, you can configure many of your apps to filter their content, and you can customize notifications settings, so you’ll only be nagged by the apps and people that you decide should be able to nag you.
Want some homework? Of course not, I would never do that to you — but I will give you a challenge! Try to configure your Work Focus Mode, and create a work-specific Home Screen Widget that’s only visible when you’re in Work mode. Share your customized Home Screens with us on Twitter @HomeMadeAuto — we’d love to see them!

Light Up Your Morning With a Simple Flashing Alarm
Light Up Your Morning with a simple Flashing Alarm
Ugh, mornings. Amirite?
If you’re anything like me, you find the early mornings a chance to be super productive before the rest of the family is up, or maybe it’s just a chance to sip your coffee in peace, but sometimes it’s just so easy to hit the snooze bar. So. Easy...
You have a light somewhere in your room, right? Maybe even one on your bedside table? Flashing that a few times can help get your attention, and wake you up. You can even add some randomness, to help the ‘Sleepy You’ avoid learning to ignore it!
A word of warning: — if you share a room with your spouse, a roommate, a sibling, or anyone else, please make sure they know you’re doing this (and please don’t blame me if the conversation tomorrow morning doesn’t go well!)
What you’ll need:
Not much - since you’ve found your way here, you probably already have all of this:
Signals for HomeKit, running on your iPhone or iPad
Supporting multiple Signals with randomness does require Signals 2.1.8, and iOS 16.1 (there’s a bug in 16 😡) - if you’re not on those versions yet, you can still create your alarm, but your Shortcut Automation will be a bit more complicated.
Any HomeKit-compatible light - Can be a Bulb, Switch or Plug (configured as a Light)
A few Signals that will control your light, and sets a custom finish. Add some variability here to keep things fresh for you every morning.
A super-quick Shortcut Automation, which we’ll walk through below

The Signals
We’ll create a few slightly different Signals for this overview, and I’ll walk you through creating the first Signal is detail. The light that I call “Matt’s Lamp” here is a Nanoleaf Essentials bulb, which supports full color — if you have a bulb that only supports dimming, or even a ‘dumb’ lamp plugged into a Smart Plug, you can still use it as an alarm, but of course your options will be more limited.
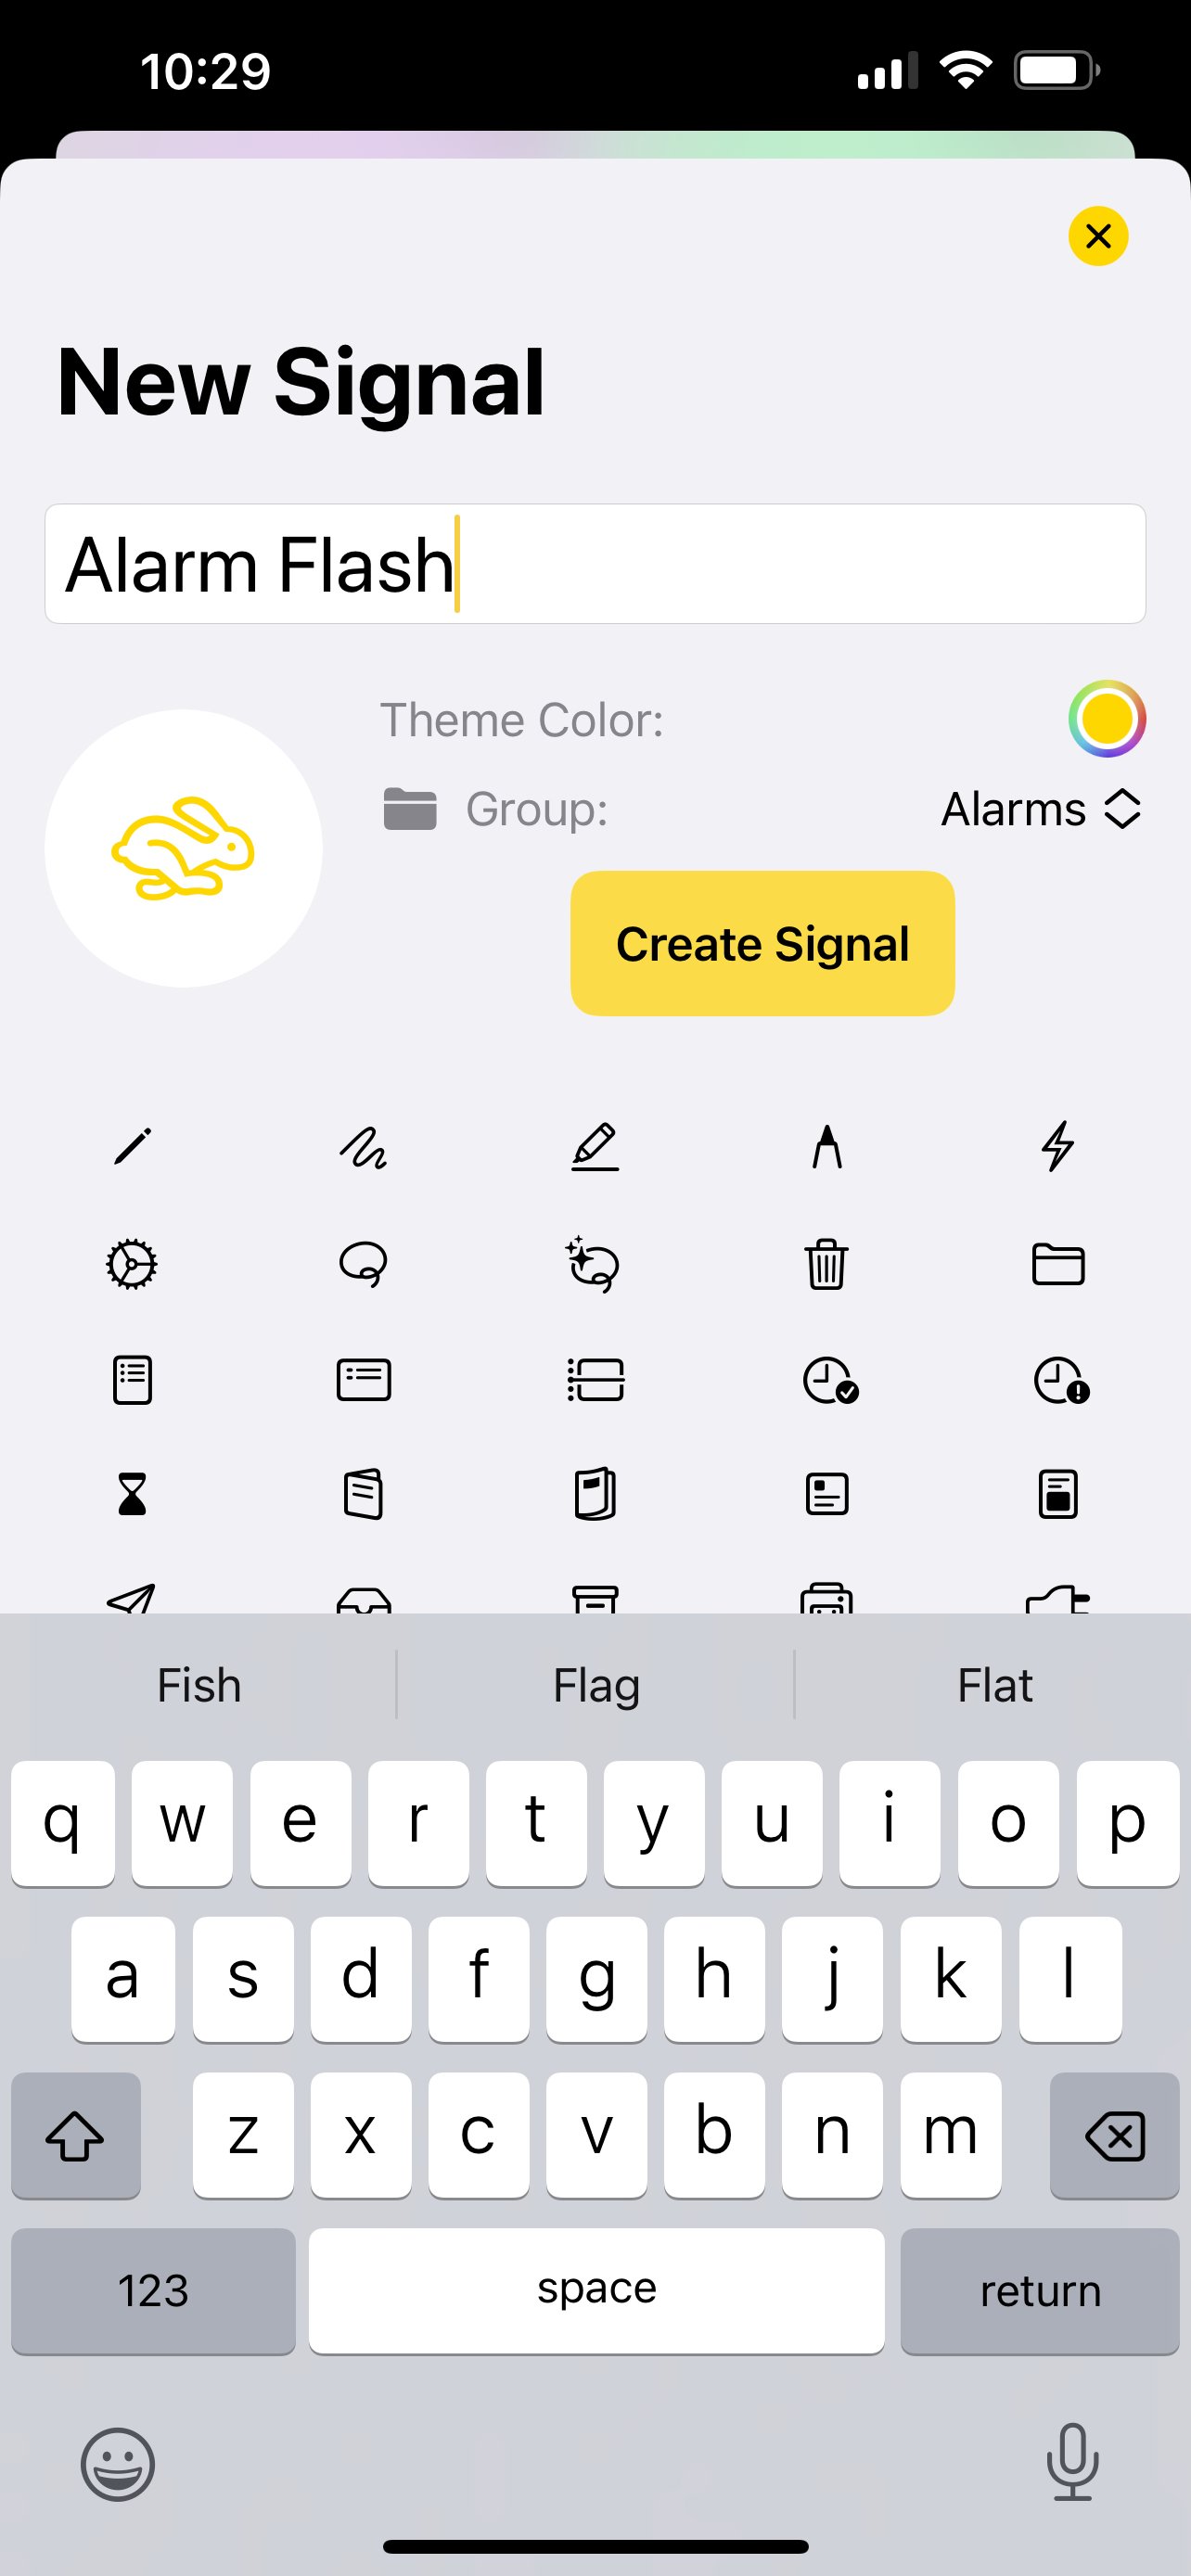
Start by tapping ‘New Signal’, giving it a name, a color, and selecting an icon. Before you’re done, be sure to tap the ‘No Group’ picker, and select ‘New Group’ — give it a name like ‘Alarm’. This will come in handy later, and make it really easy to filter all of your Alarm Signals, and pick a random one during your Automation.
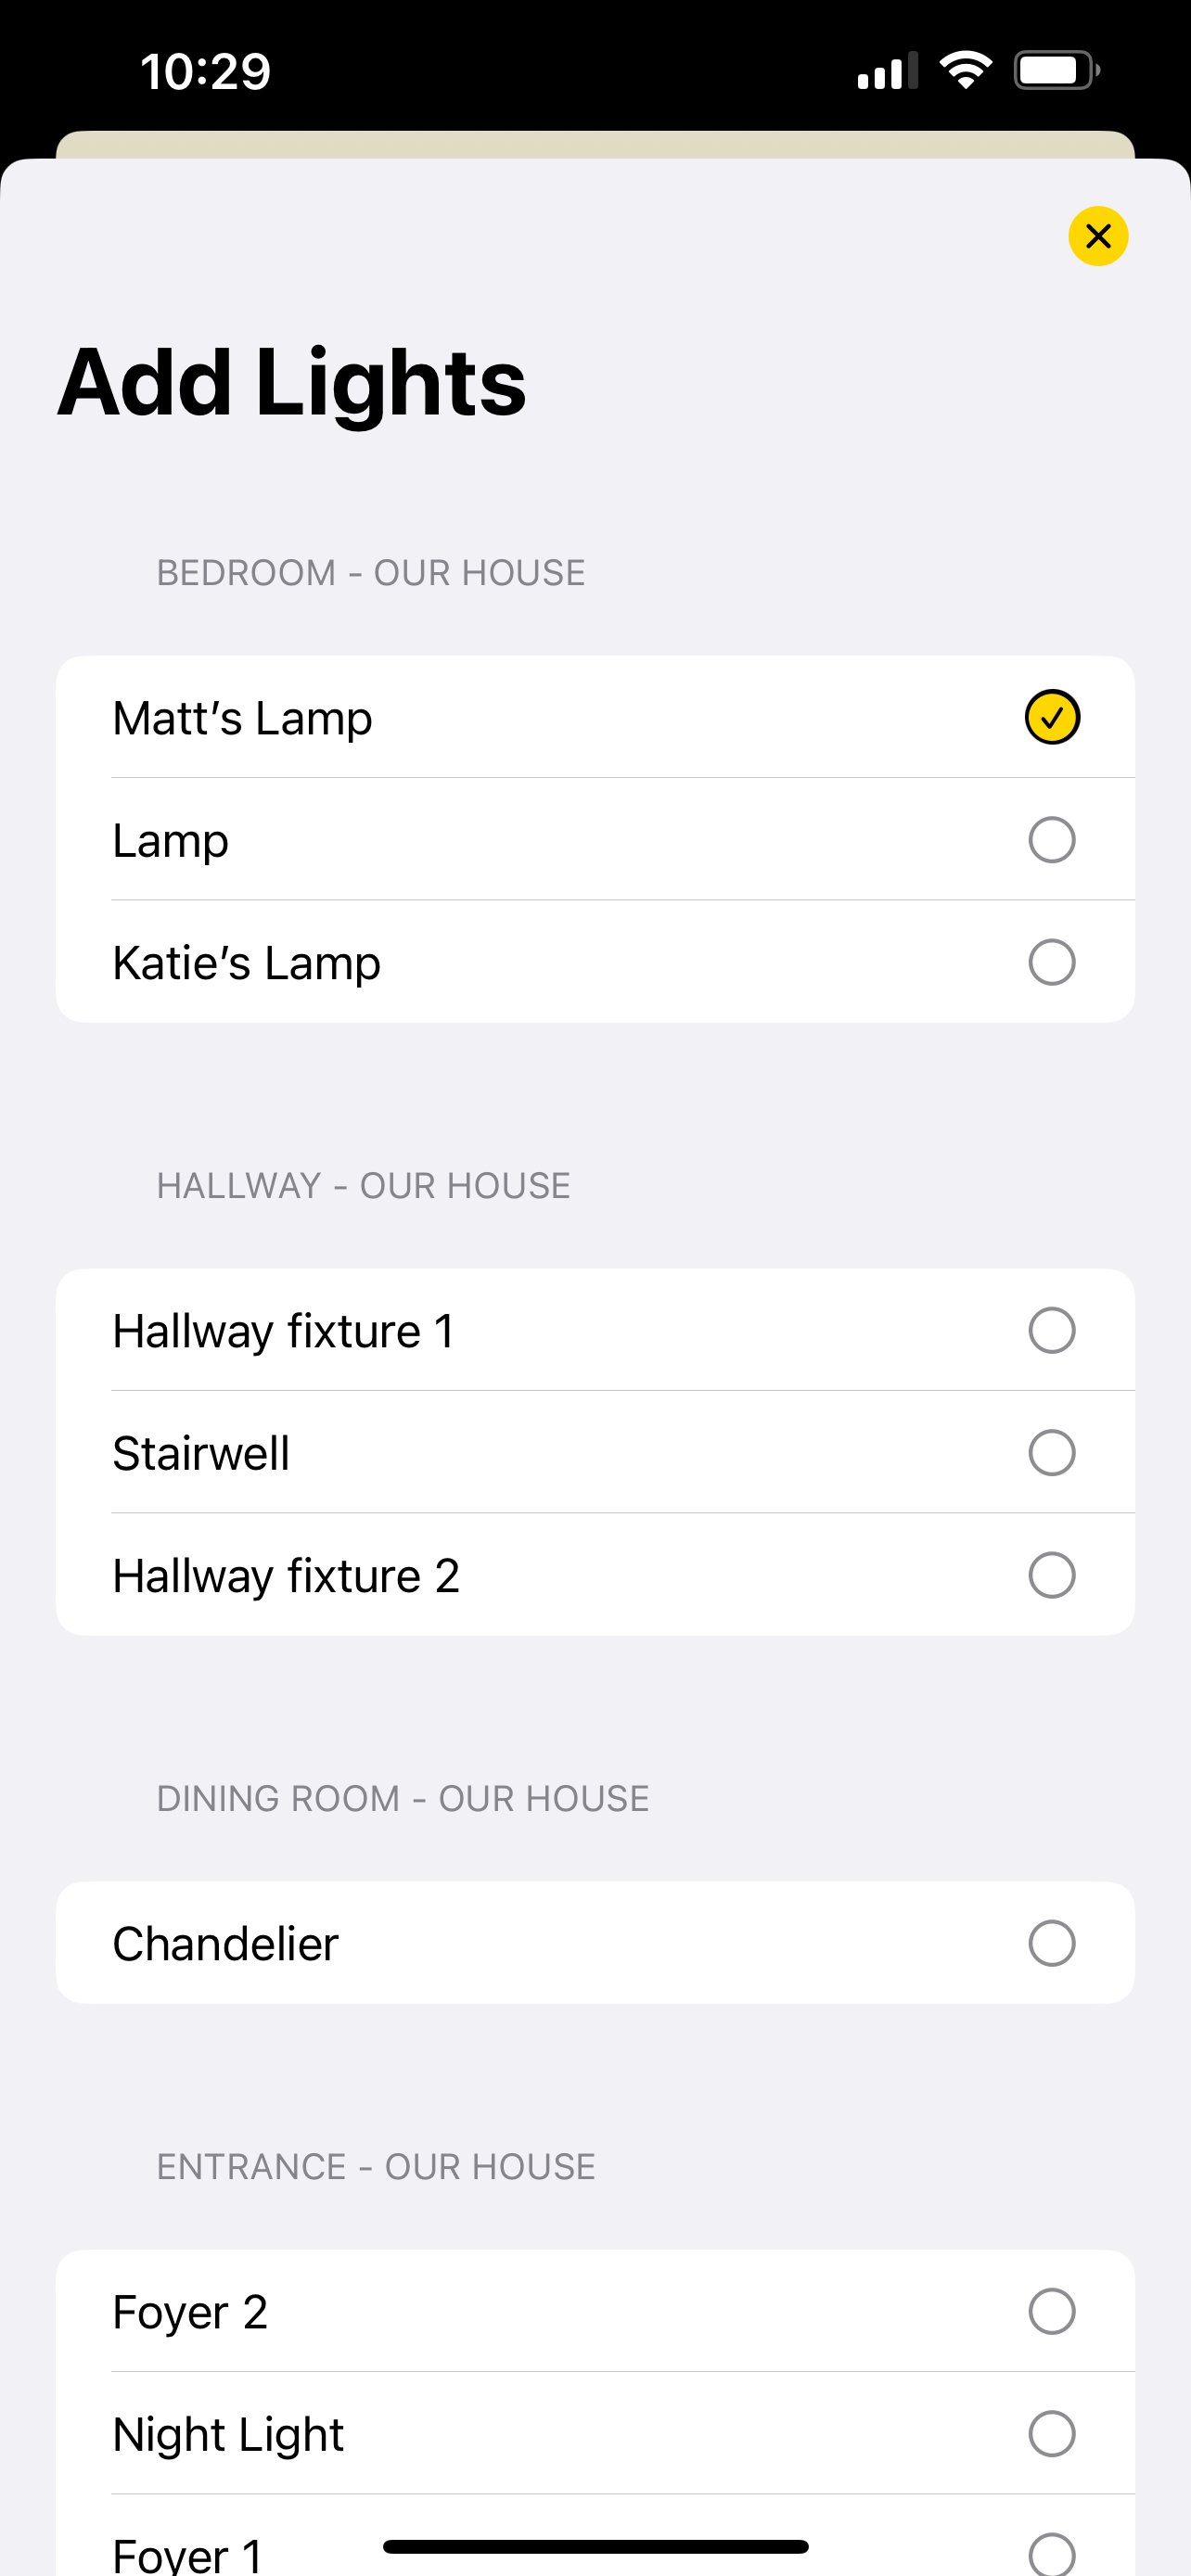
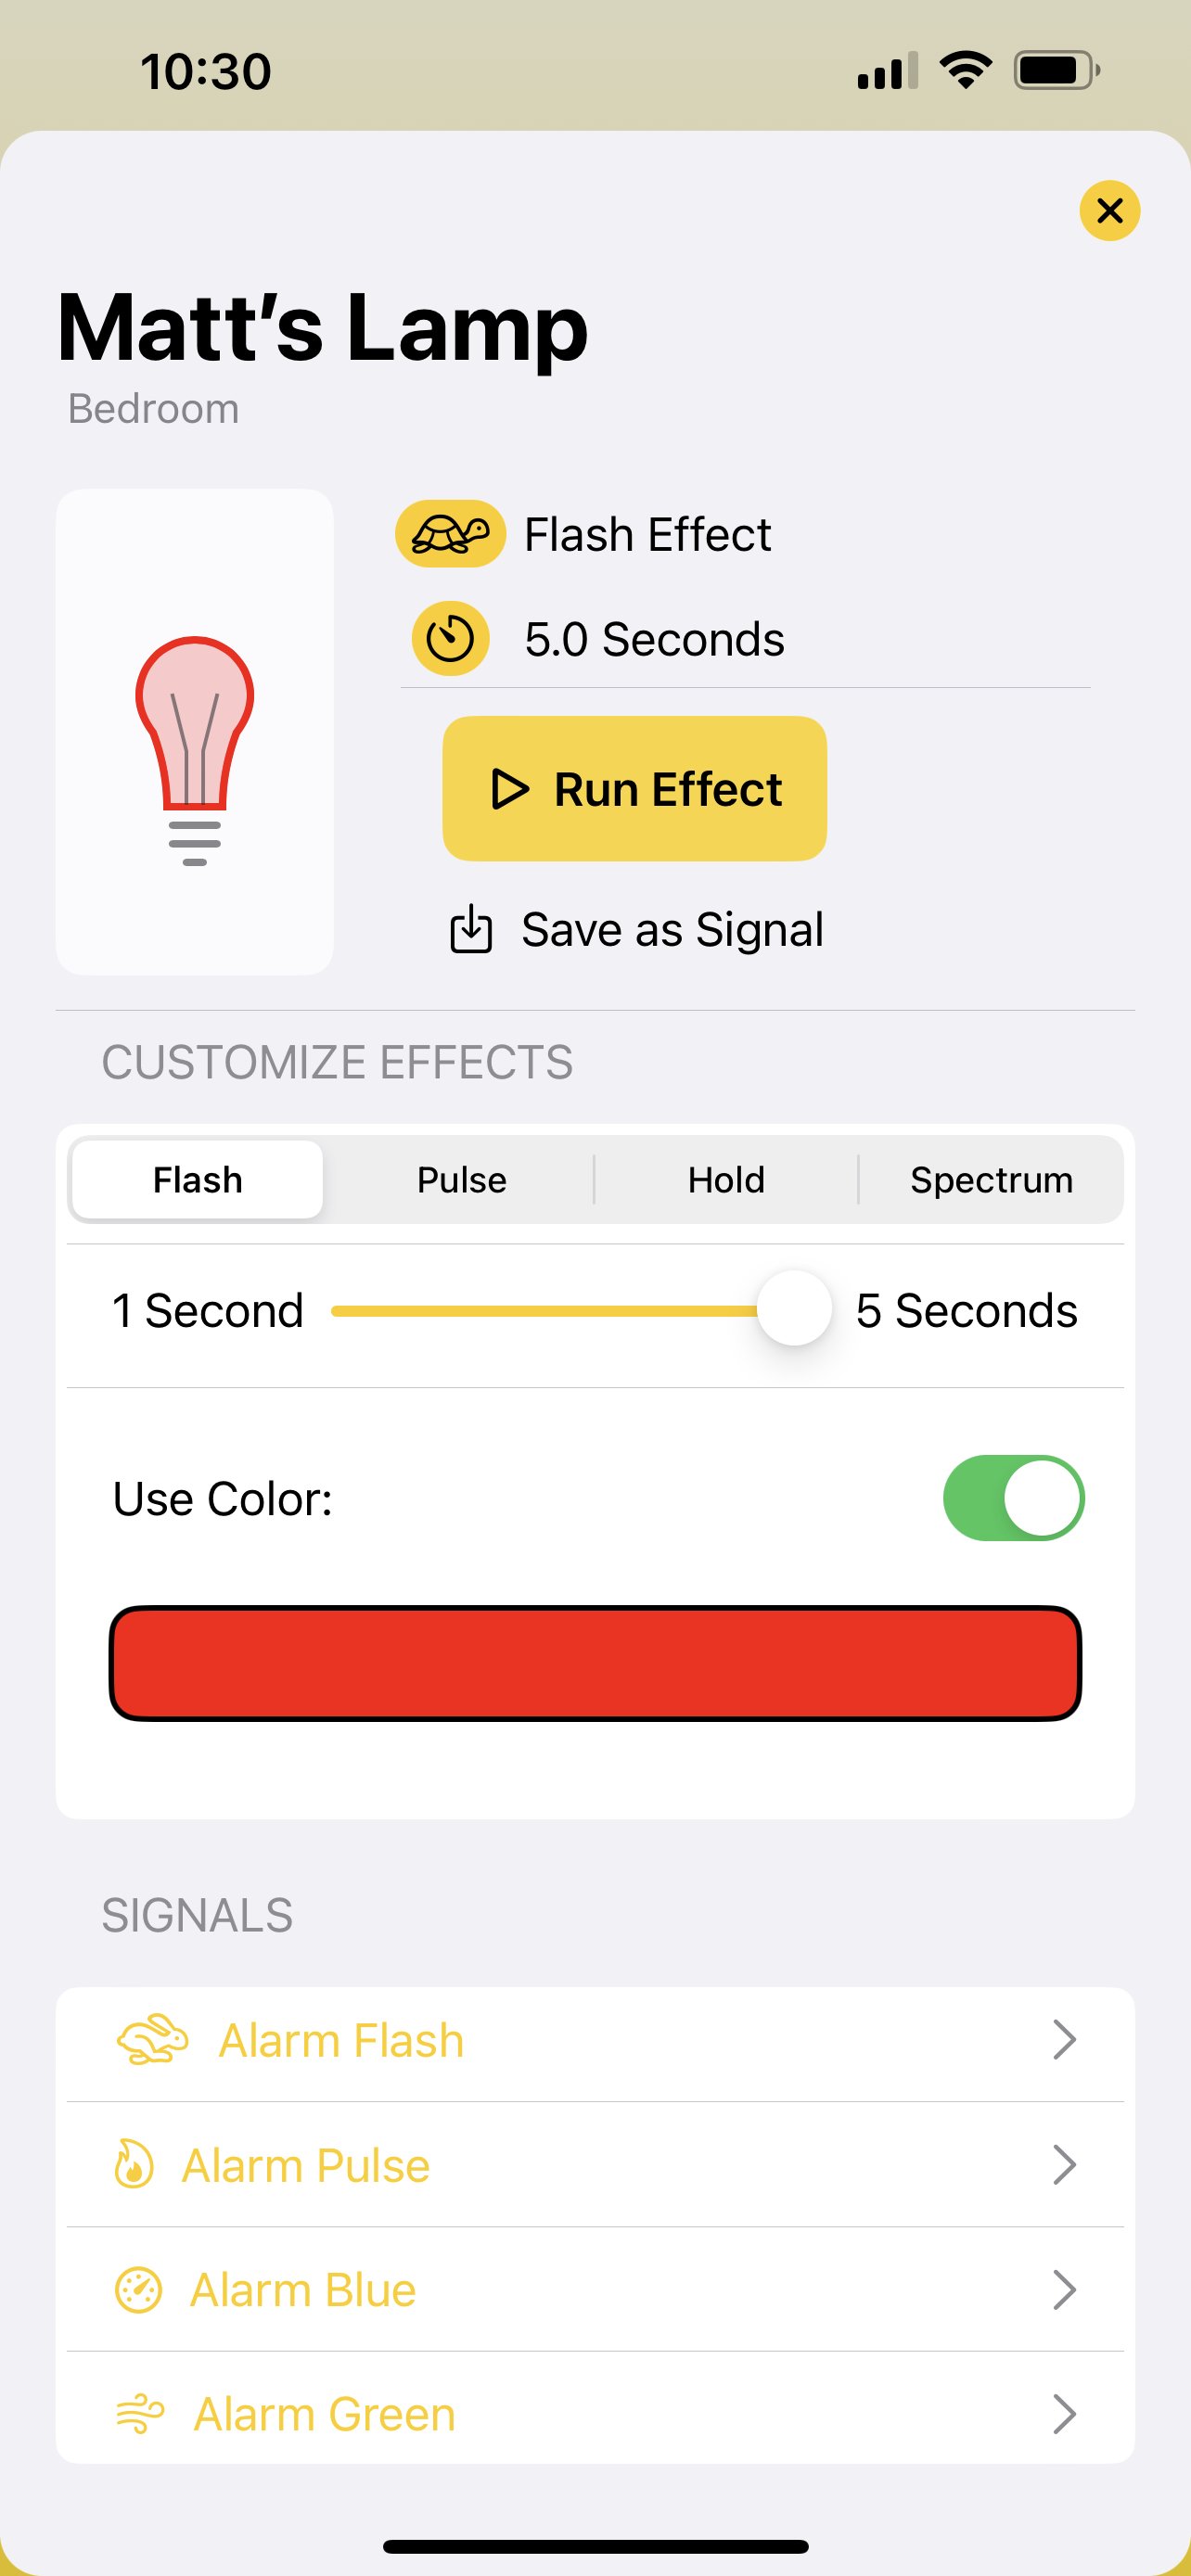
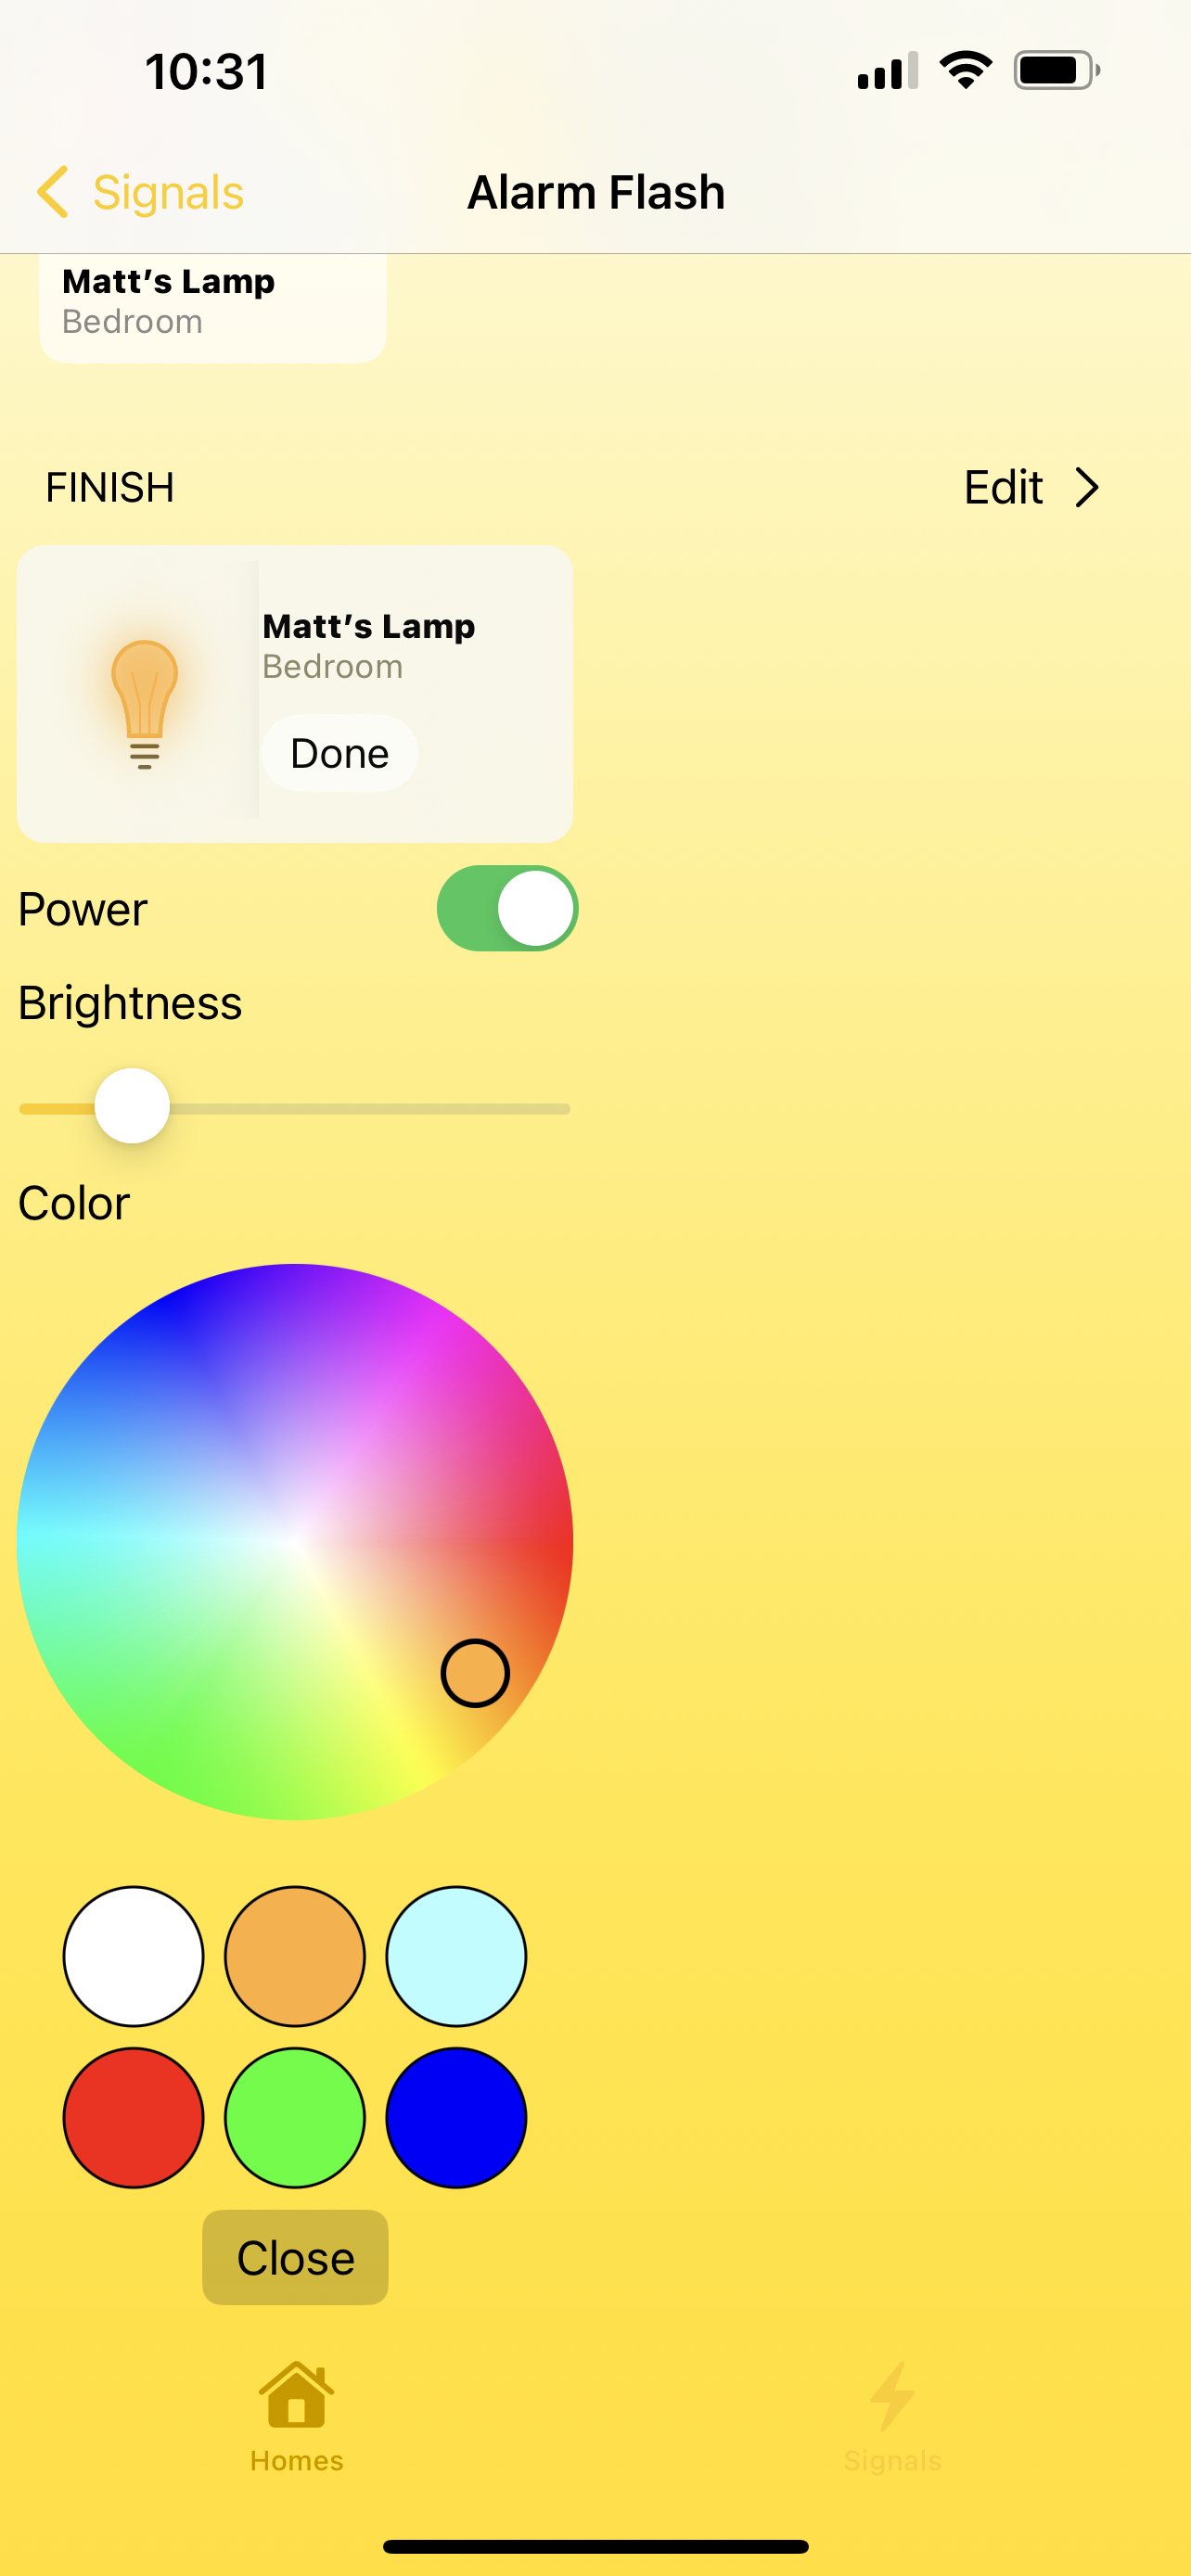
Now that you have the Signal created, it’s time to tell it what to do. Start by tapping ‘Edit >’ in the ‘Effects’ section, and selecting your bedside lamp. Back on the Signals screen, tap the ‘…’ button on the selected light tile, and further configure the Effect - in this case, I chose the ‘Flash’ effect, moved it up to 5 seconds, and chose to flash the light red.
When we’re done, this Signal will return the bulb to its’ previous state — presumably off, since this is an alarm clock. I really like to change this up, though, and in this case, I’ve created a custom ‘Finish’, to keep the light on at a relatively dim level, and turn it orange.

And that’s it - we’ve configured our first Signal! I always recommend running this, to make sure it will do what you want. You can do that right from this screen, and tweak it to make it work for you, but don’t forget that you’ll have a few other Signals created to mix things up — I’ll leave it to you to create this in whatever way works best.
The Shortcut Automation
Creating the Shortcut automation is deceptively simple, in large part because of some simple new features that Apple has provided to developers in iOS 16.
Start by opening the Shortcuts app, tapping the ‘Automation’ tab at the bottom, and creating a new Shortcut by tapping the ‘+’ button. For this automation, you’ll want to create a ‘Personal Automation’, select ‘Alarm’ as the trigger, and configure it to run when your ‘Wake-Up’ alarm ‘Goes Off’. The wording of this on the screen is a little odd, but it makes sense as a command to “Run this Automation when my ‘Wake-Up’ alarm Goes Off” - this includes repeated alarms if you like hitting Snooze, which is a nice touch!


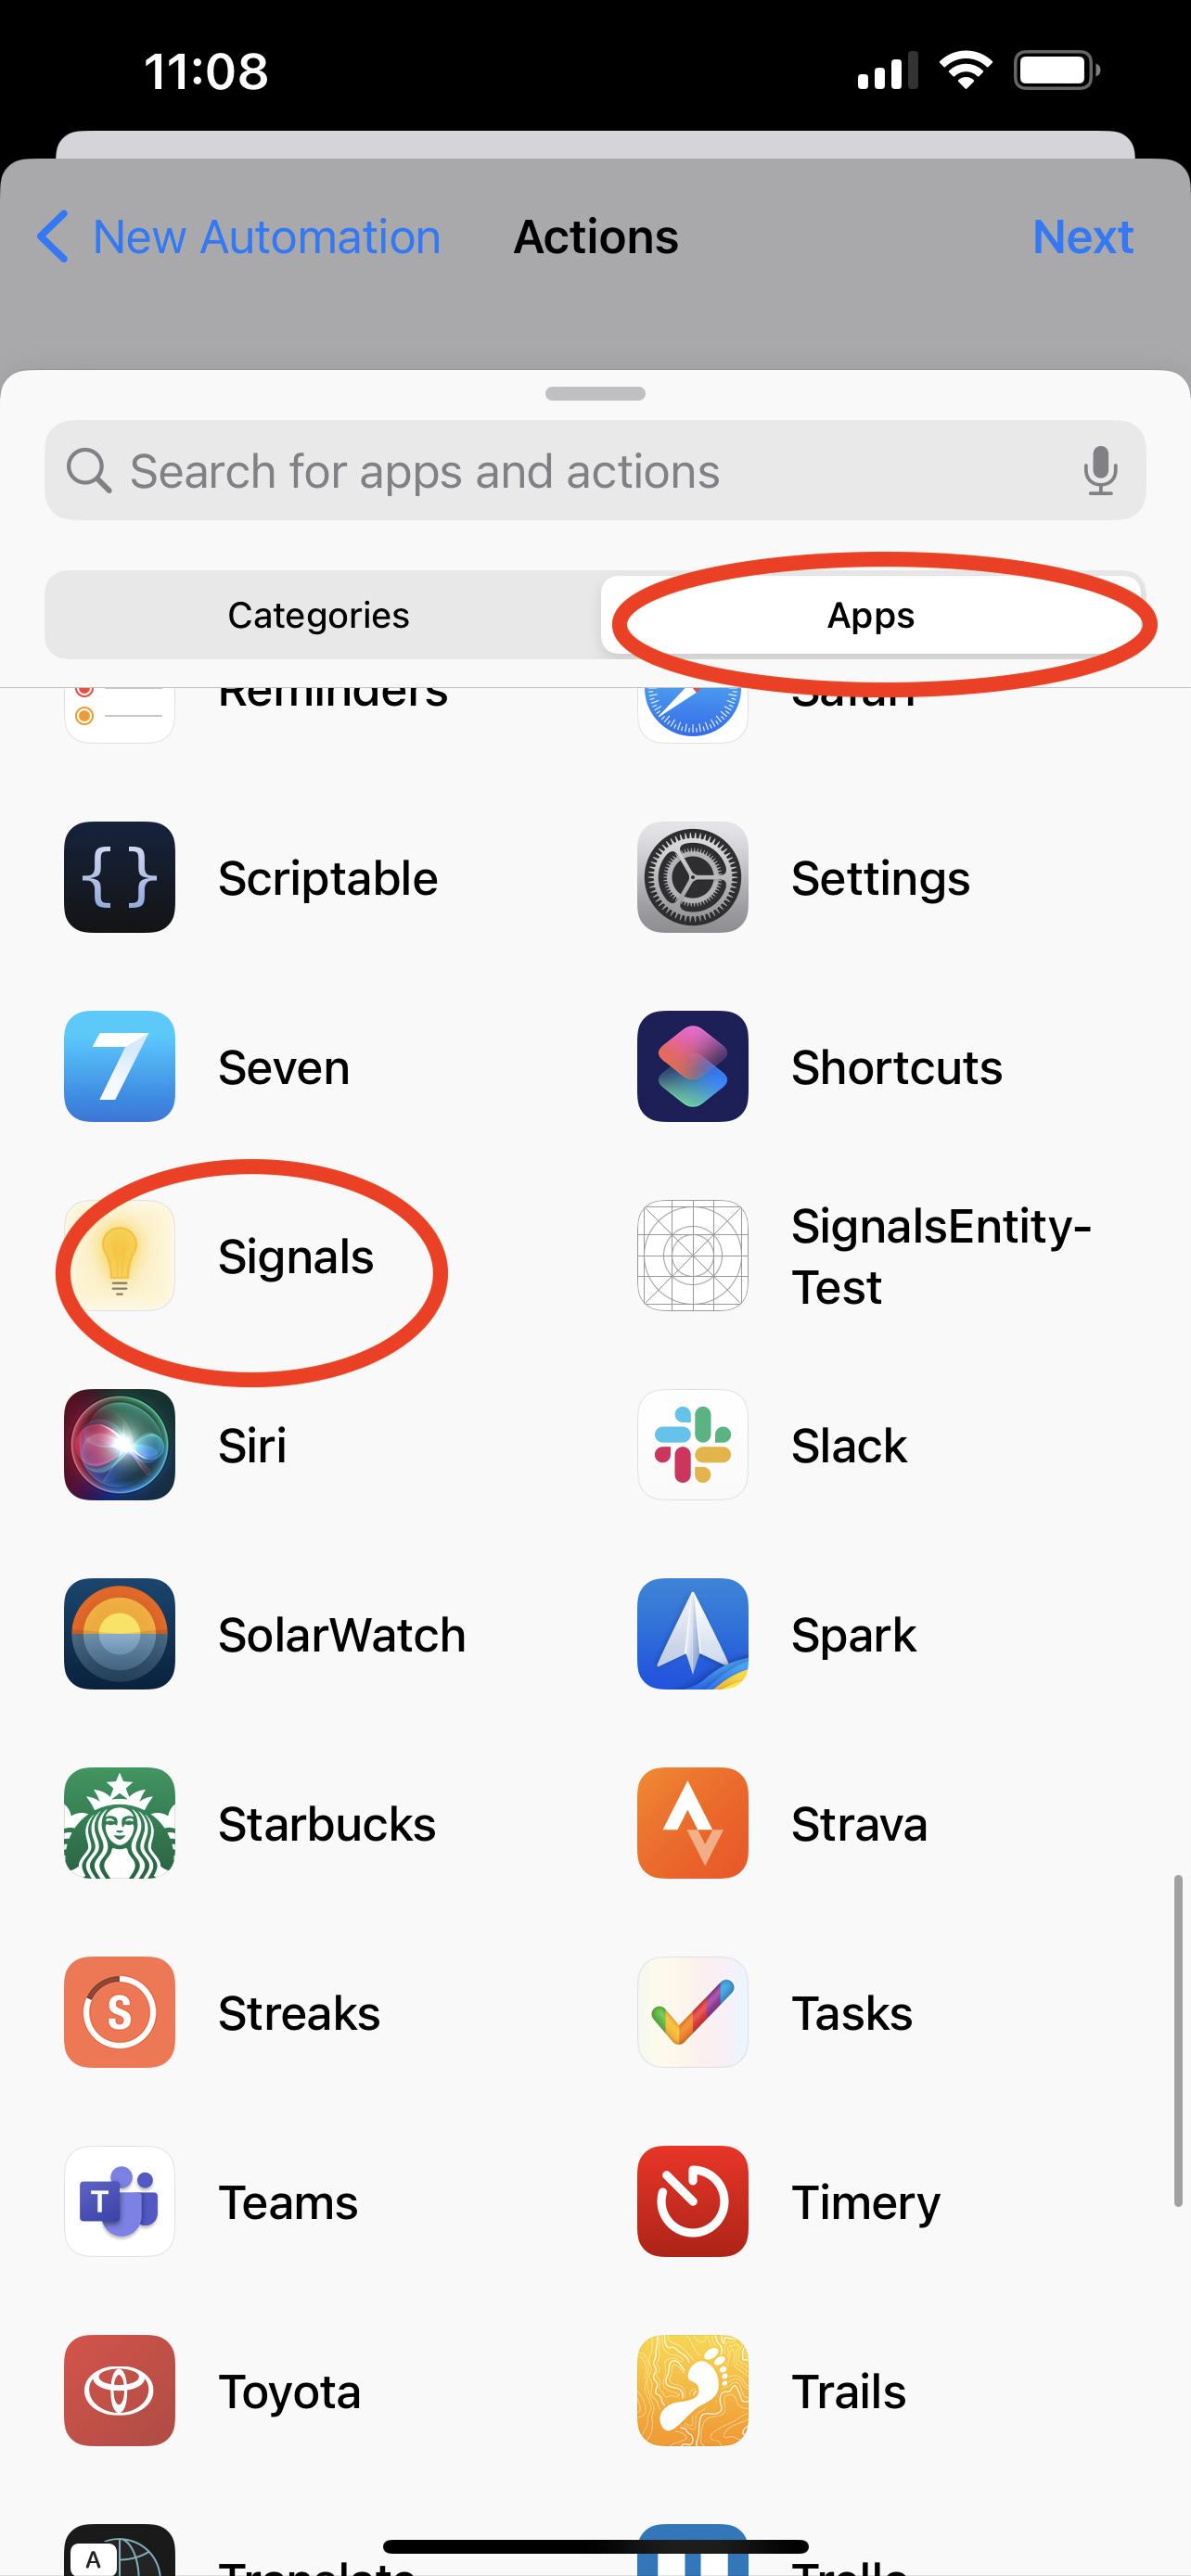
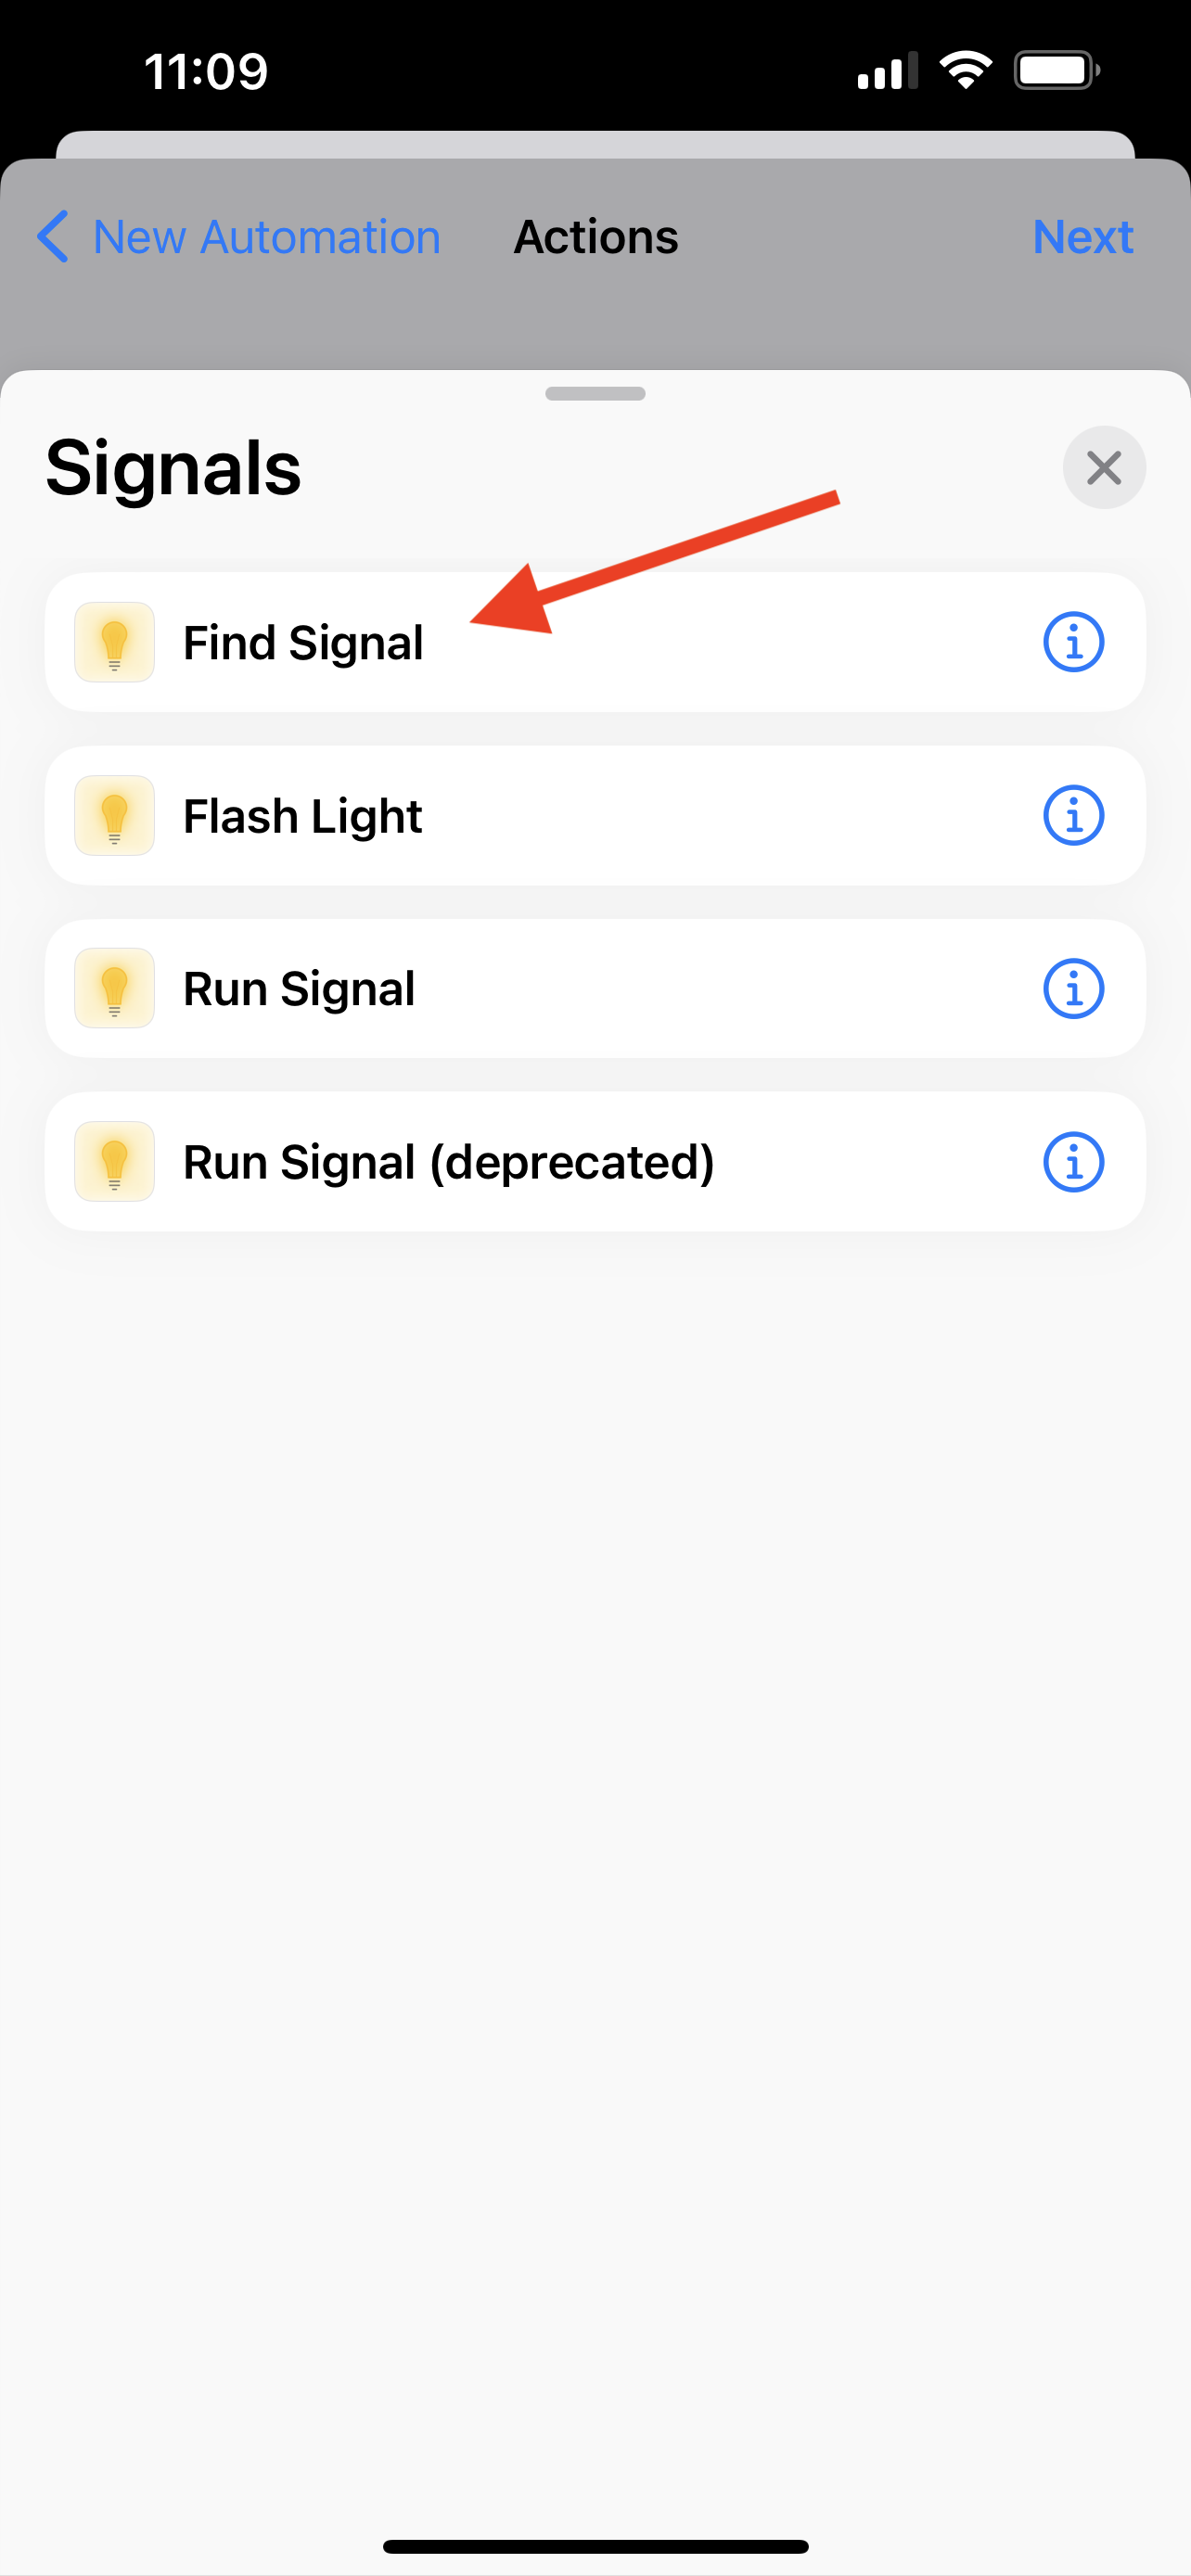
That’s the Trigger configured - tapping ‘Next’ will bring us to the Actions screen. Start by tapping ‘Add Action’, selecting ‘Apps’, and scrolling down to find ‘Signals’ (you’ll need to scroll for a while if you have a lot of apps installed, like I do 😳). This should show you a list of available actions - tap ‘Find Signal’.
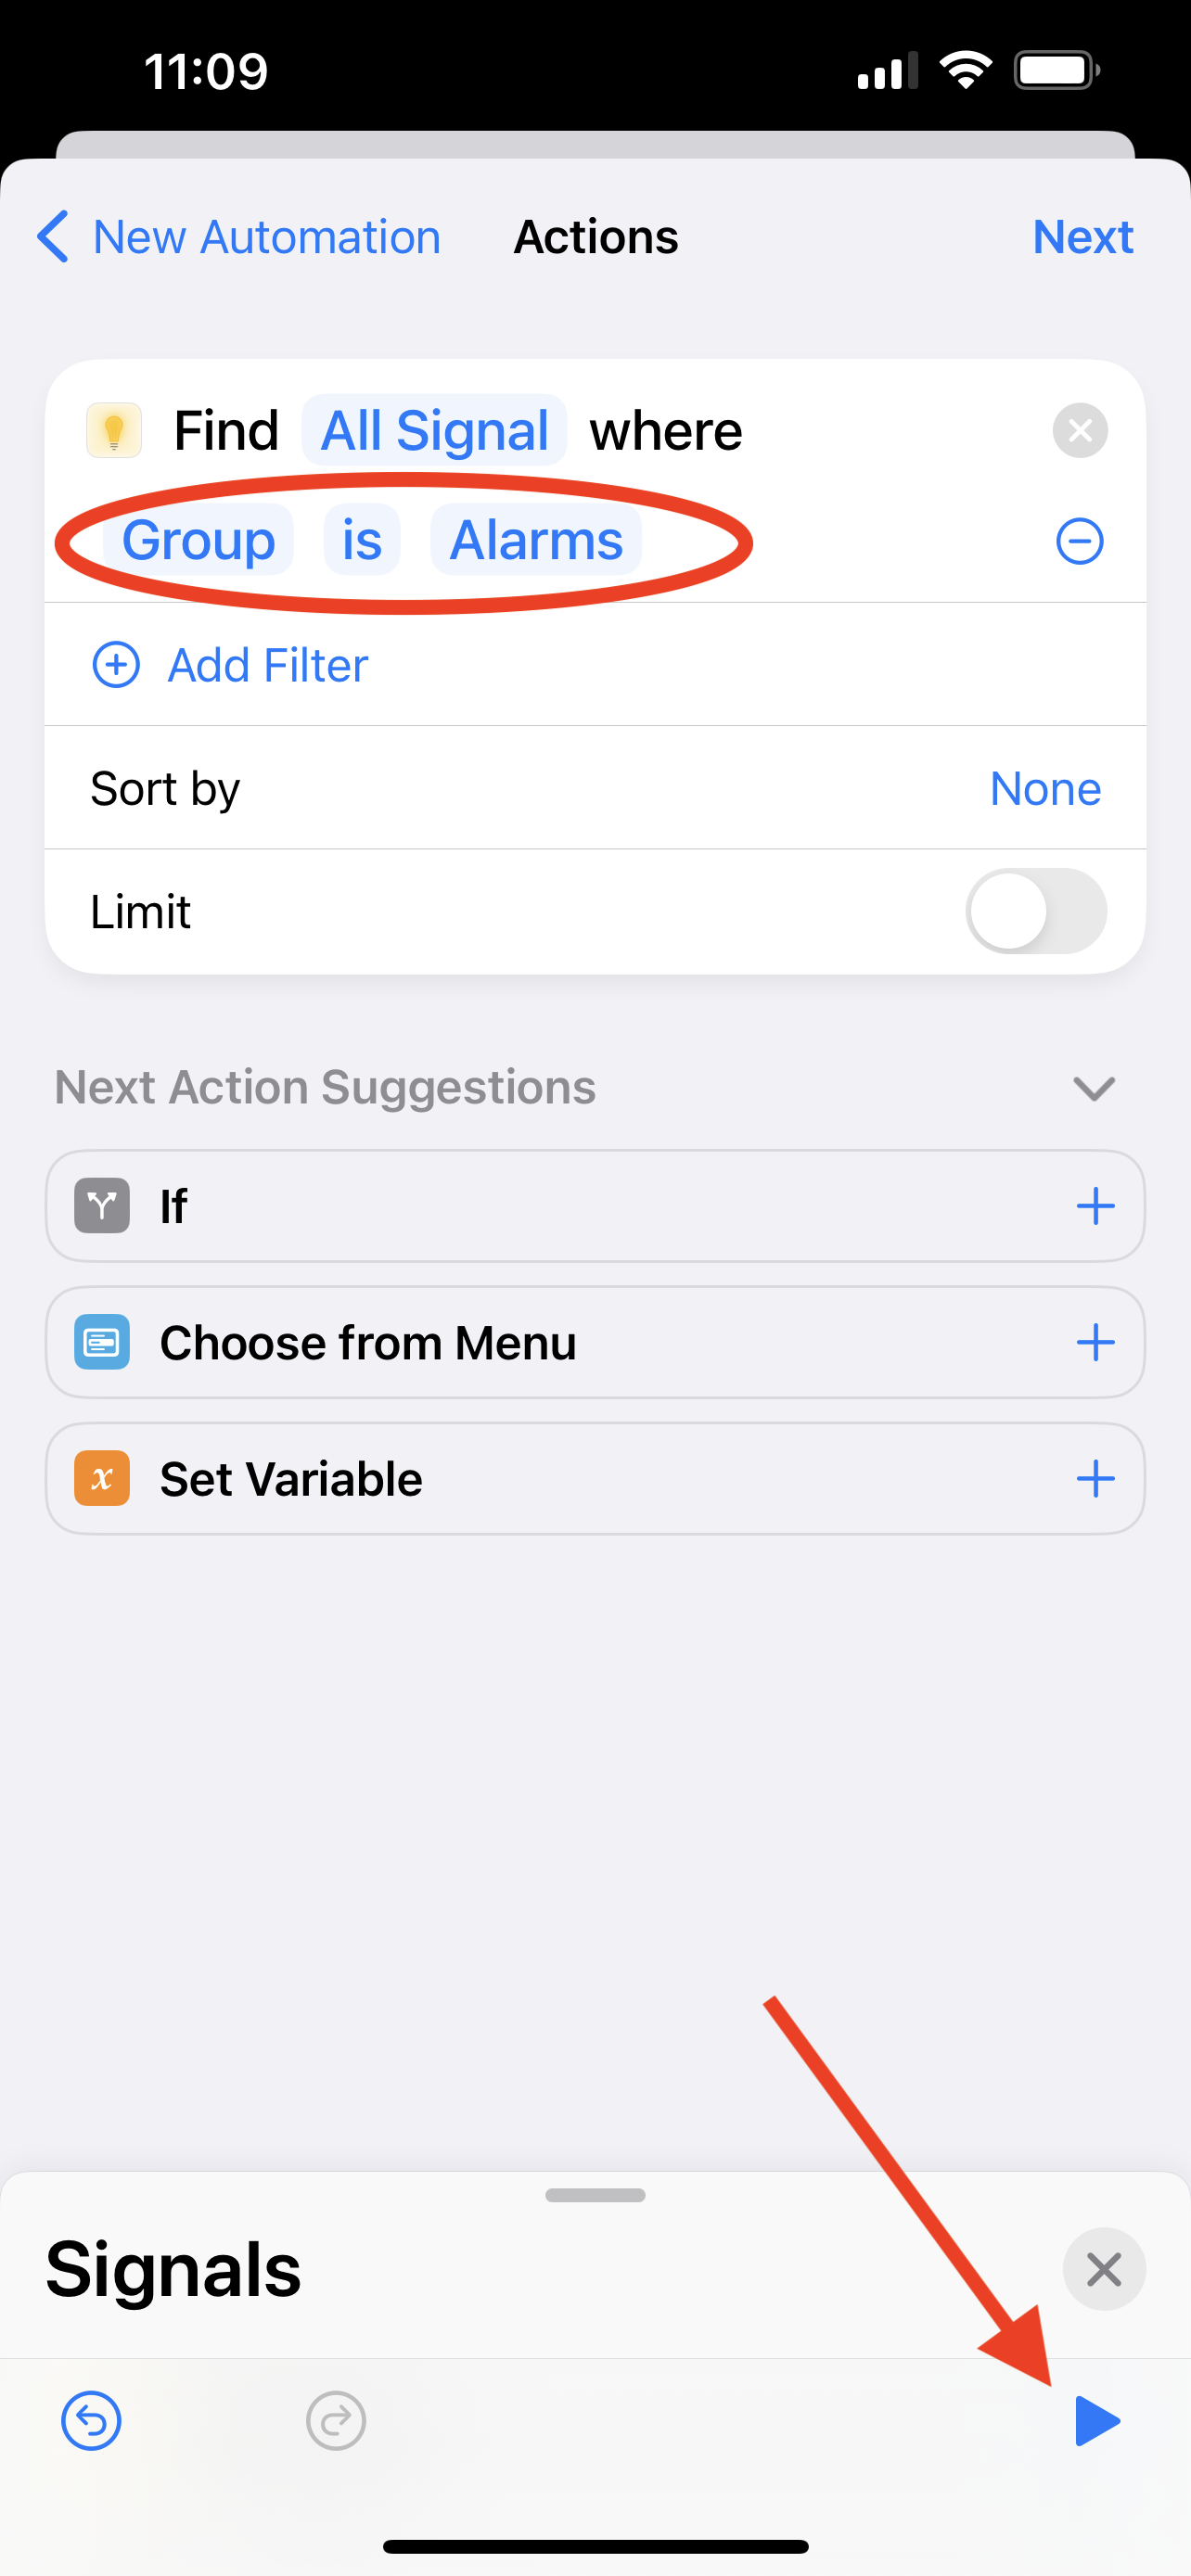
This is where we’re going to find all of our ‘Alarm’ Signals, and if you added them all to the same Group, it’s simple. Tap ‘Add Filter’, which will be pre-loaded with a filter that reads “Name Is _____” - tap the ‘Name’, and change it to ‘Group’, and then tap the ‘____’, and select your ‘Alarms’ group. That’s it! This would be a good time to run your action, to make sure that it shows you the list of your Alarm Signals, and nothing else.

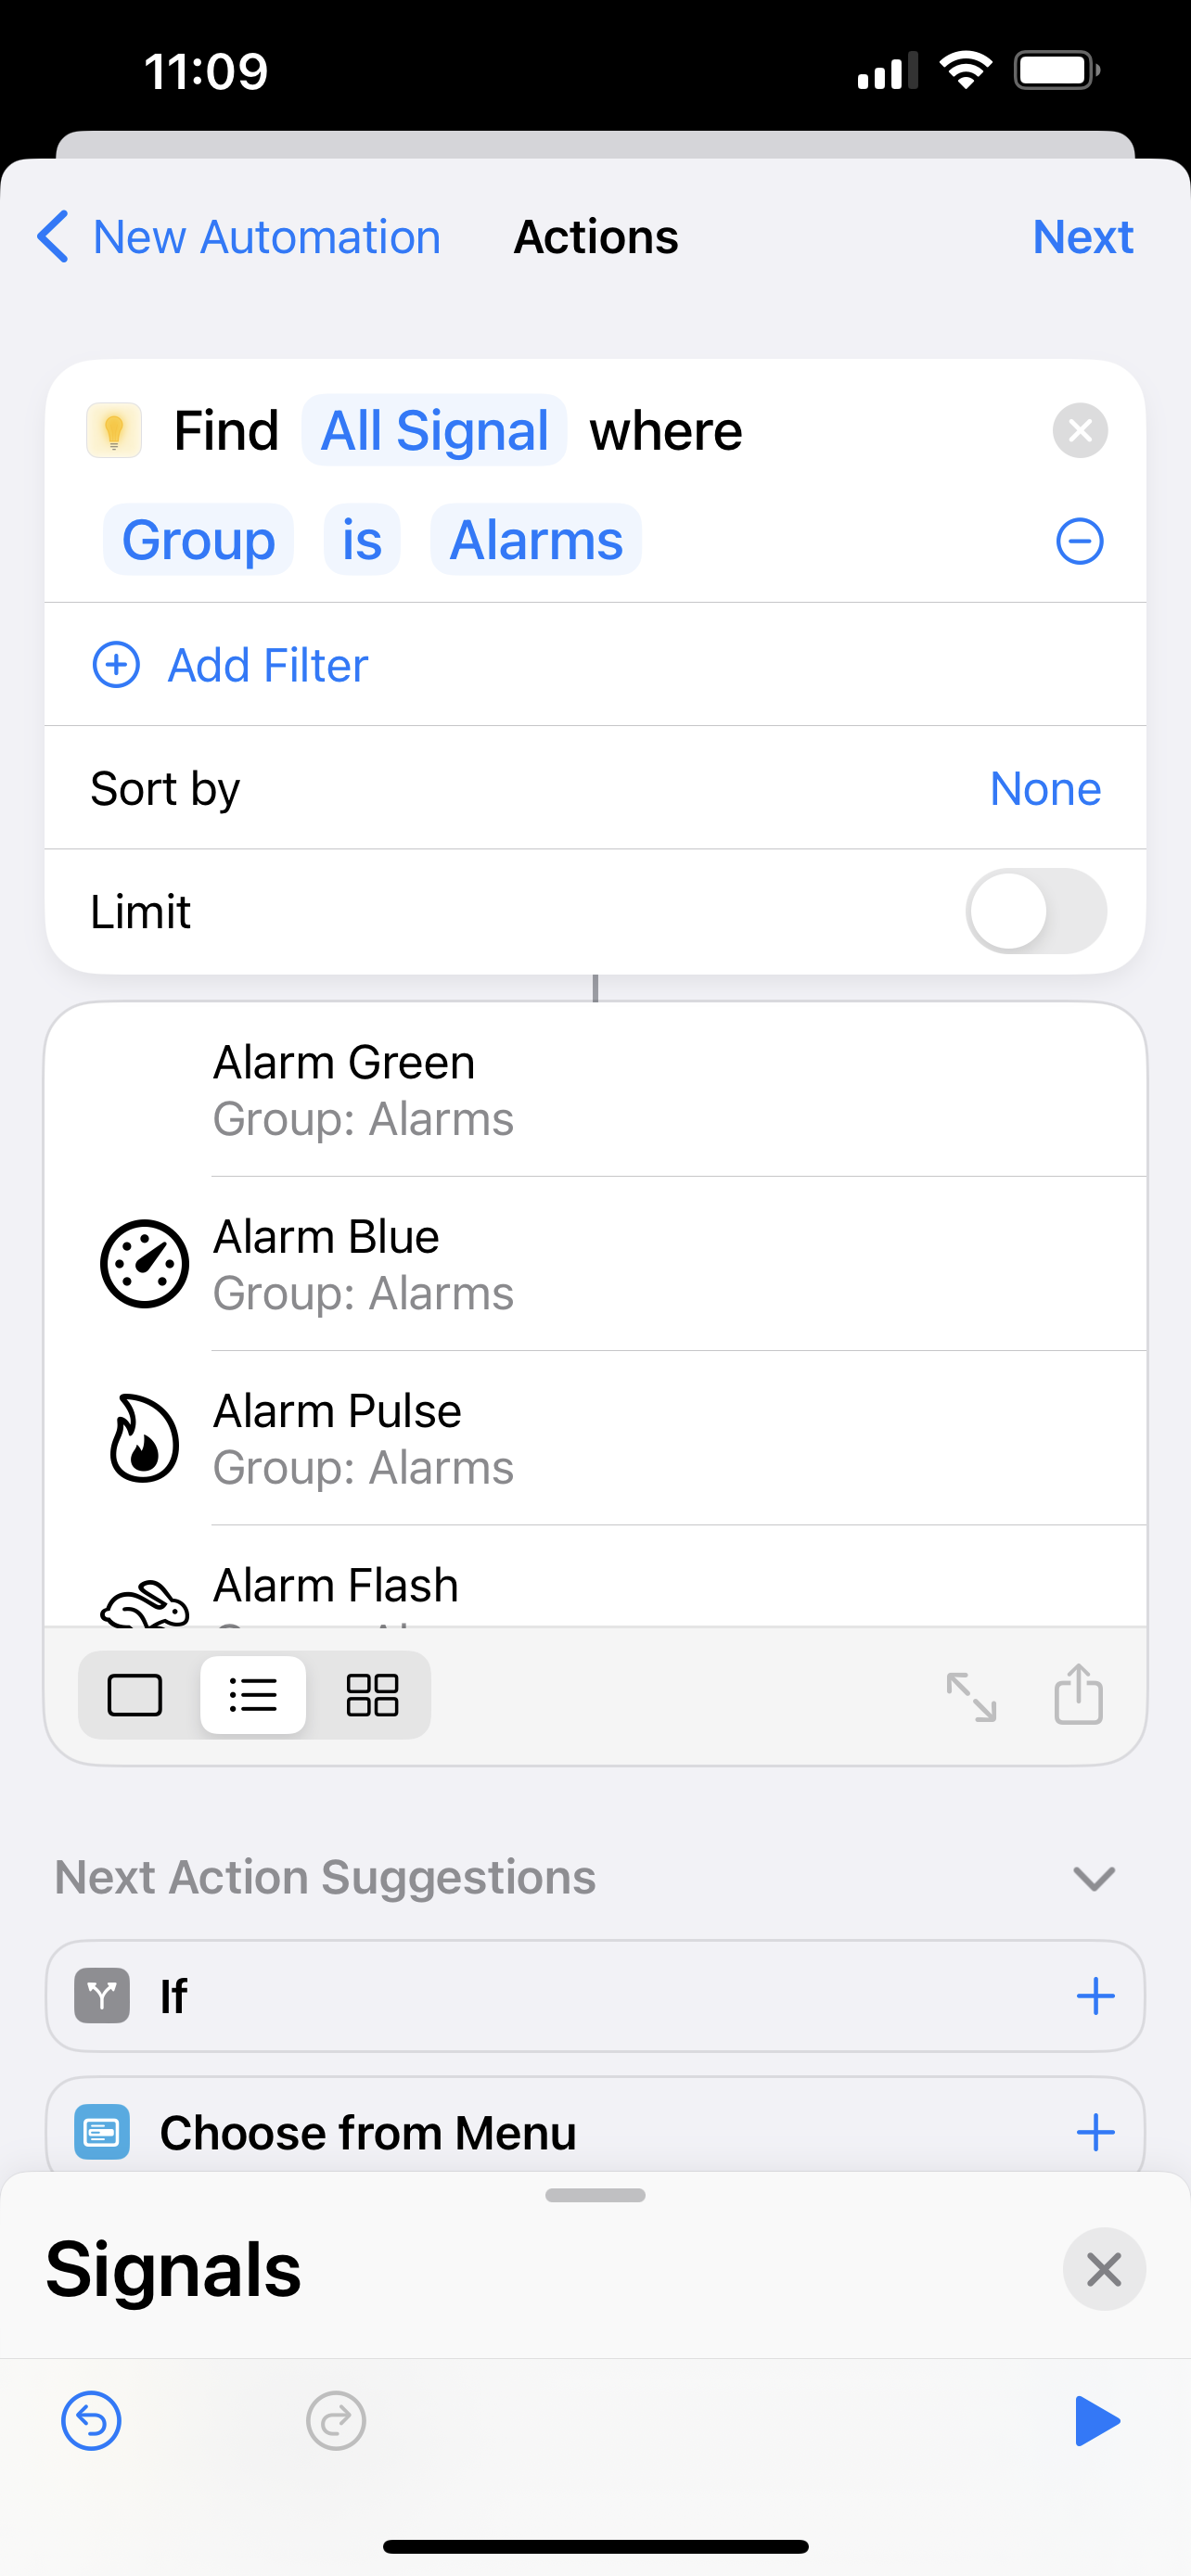
Now that we have a list of all of our alarms, we need to pick one. Shortcuts comes with a built in command to ‘Get Item from List’ - the easiest way to find it is to search for ‘Random’, which should provide it as one of the first results. Selecting that will add a second Action to your Automation, which will probably read “Get First Item from Signal“ - make sure to tap the ‘First Item’ option, and change it to ‘Random Item’.
Finally, search for ‘Signals’ again, select the ‘Run Signal’ action, and make sure it reads “Run Item from List”. Before you’re done, I recommend tapping the little arrow in this final Action, and turning the “Show When Run” option off.
This would be a great time to run your Automation - do it a few times, and you should see that the Signal that is selected is chosen randomly. Nice!
We’re almost done, but there’s one more really important step. Tap ‘Next’, and be sure to turn off the “Ask Before Running” option — if you forget to do this, your phone will simply prompt you to run the Signal when your alarm goes off, which is probably not going to get your attention.


Done!
And that’s it! Does this help you out? I would love to hear about it - you can reach out to me on Twitter at @HomeMadeAuto!

Use HomeKit and Shortcuts to Pause your Work when you Leave your Office
Time for a break? No problem - learn how to create a Shortcut to pause your focus session, and trigger it automatically when you leave your office!
In our previous entry, we gave you a recipe to help you get into your focused zone using Shortcuts, a few excellent 3rd Party apps, and Signals for HomeKit, using a HomeKit button — but what if you need to go to the front door to get a delivery, or just need a break? You’ll be left with a running a Focus timer, and your devices will still be in Work mode — that’s no good!
Well, there’s an easy way to pause your focus session for a few minutes, and then get it started again using Shortcuts, and a few automation triggers from Signals for HomeKit on your Mac.
*Before we start, download this updated version of our previous Focus Time Shortcut - it includes a few changes that will help it work together with the Shortcut we’re introducing here.
What you’ll need:
A Mac running Monterey, with Signals for HomeKit installed
A Contact Sensor on your office door, and/or a HomeKit Button
This Shortcut, and a few Apps to help you get focused. This Shortcut includes:
Focused Work - A flexible Focus Timer that helps you stay productive, by Michael Tigas
Data Jar - A simple database, designed to be used with Shortcuts, by Simon B. Støvring (it’s a free app - don’t forget to tip the author!)
The Shortcut:
Here’s the Shortcut that will help you take a break - you can customize this to do whatever you want, of course. Here’s what this will do to start you off:
It will check to see if you have a live focus session, using Data Jar — if you don’t, it will exit
Your Focus Session timer will be paused in Focused Work
Your active Focus Mode will be disabled
You’ll be prompted if you want to resume your work session, so when you get back to your desk, you pick up where you left off
If you answer ‘yes’, your Focus Session timer will be resumed, and your Focus Mode will be re-enabled

The Automation(s):
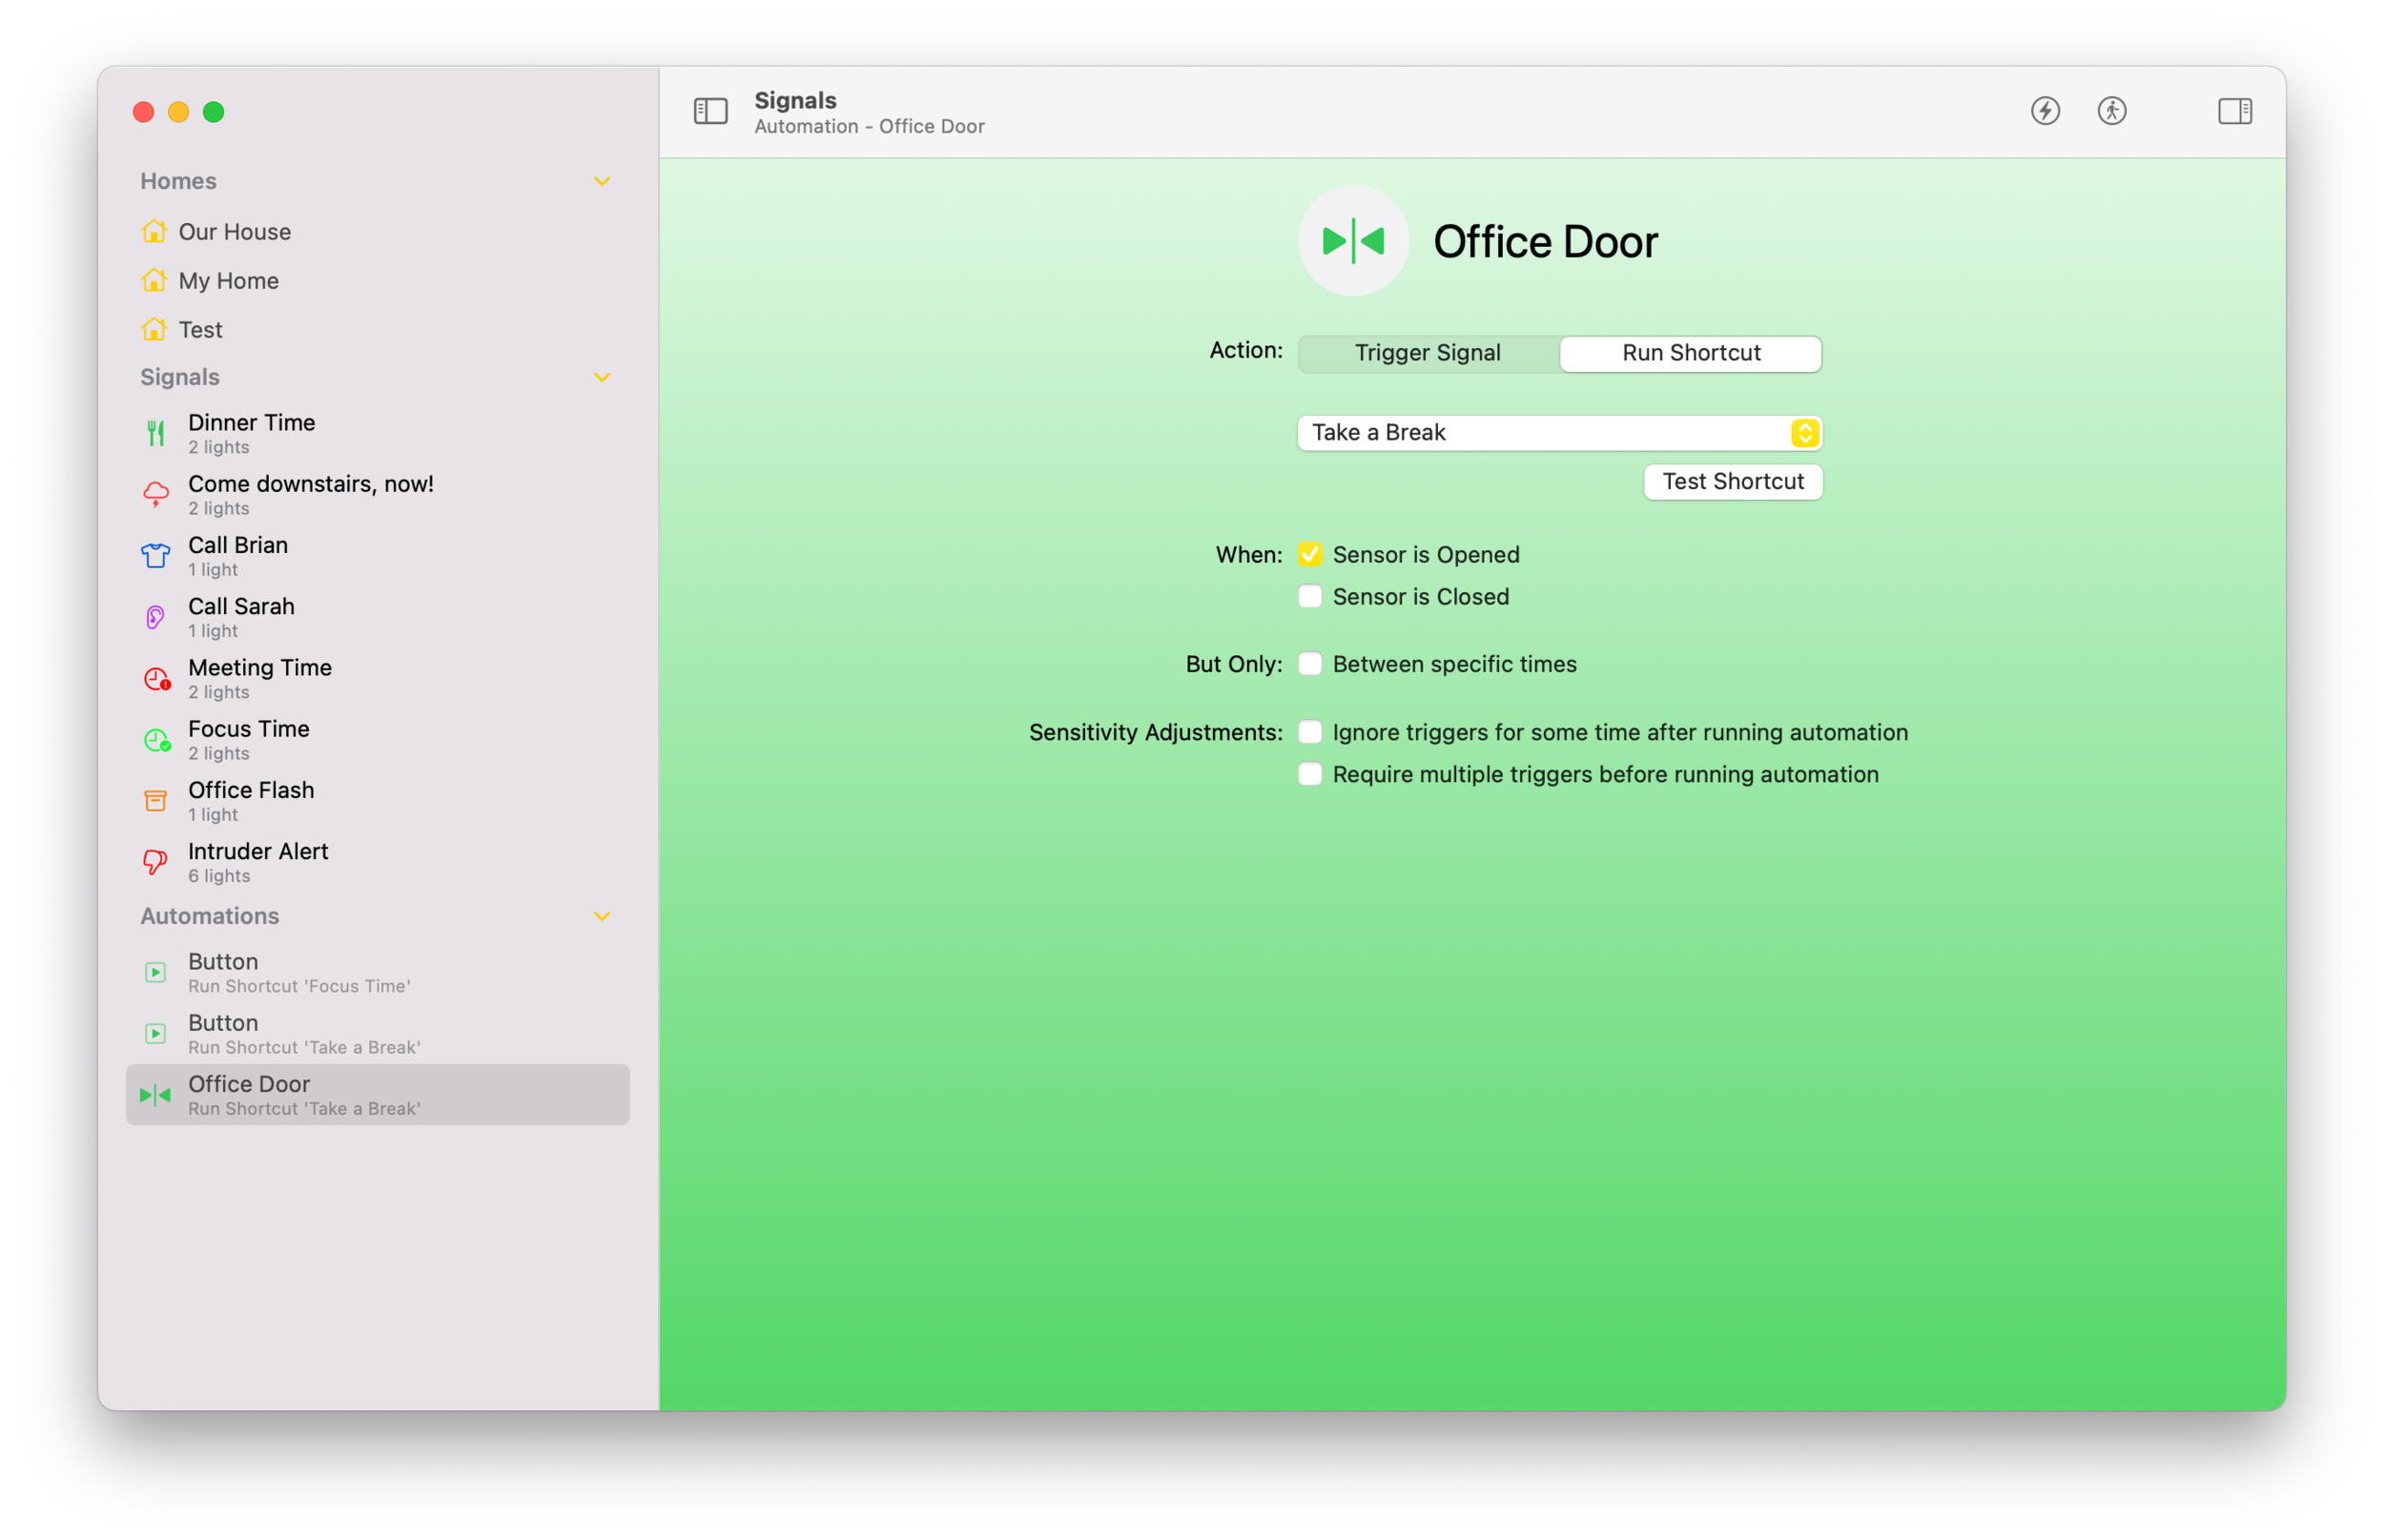
This is an excellent Shortcut to trigger with a HomeKit button. I personally have this running on the same Aqara button that triggers the ‘Focus Time’ Shortcut — a Single Press turns on the Focus Time, and a Double Press runs the Take a Break Shortcut. So easy!
But what if I leave my office and forget to hit the button? No problem! With the recent update to Signals for HomeKit on the Mac, you can automate Shortcuts with Contact Sensors — a strategically placed Aqara Contact Sensor on my office door triggers this shortcut automatically, and the ‘do you want to resume’ prompt helps remind me to turn it back on when I get back!
And it’s as easy as that! With just two Shortcuts, and a few automations, triggered by Signals for HomeKit, you can help get yourself into a super-productive focused zone, and ensure that when you take a break, you can get back into the zone as quickly as possible!
Ready to give it a try? Download Signals for HomeKit now!

Get More Focused with Shortcuts and Signals for HomeKit
Get into your focus zone more easily, with Shortcuts and Signals for HomeKit
All of us need to get into that laser-focused mode sometimes, and there’s nothing worse than distractions to prevent it from happening. With Signals for HomeKit on the Mac, hitting a simple button on your desk can tell your Apple devices to remove distractions, and adjust your environment to help get you into that zone.
What you’ll need:
A Mac running Monterey, with Signals for HomeKit installed
A HomeKit button
This Shortcut, and a few Apps to help you get focused. This Shortcut includes:
Focused Work - A flexible Focus Timer that helps you stay productive, by Michael Tigas
Dark Noise - A simple yet powerful way to play ambient noise to help you focus, by Dark Noise, LLC
Data Jar - A simple database, designed to be used with Shortcuts, by Simon B. Støvring
The Signal:
Let’s start by creating a Signal to let your family know you’re trying to focus, and to set your office lighting just right. Open Signals for HomeKit on your Mac, and click the ‘New Signal’ button in the toolbar. Click the ‘Customize Effects and Finishes’ button, find the lights you want to flash, and drag them into the ‘Effects’ area - for me, the Foyer lights are right outside my office door, and are perfect for this. To customize what each light does, click the arrow next to ‘Run Effect’, and adjust the effect type, duration and color to whatever suits you.
Flashing lights for a few seconds isn’t enough to let your family know you’re buys for the next 30 minutes, though, so let’s make sure the lights stay red when the flashing effect completes. Drag those same lights into the ‘Finish’ area, click ‘Edit’, and set them to leave the Power on, the Brightness to an appropriate level, and the Color to red.
Don’t forget that lighting can have a significant effect on your own mood. You can add custom Finishes to the lights inside your office to set them to a level that helps you focus as well. My favorite is to turn the light on my desk to a low level, and my ceiling lights to a nice warm color.

The Shortcut:
Download this Shortcut to get you started. This Shortcut does a few things by default, but you can customize it to do whatever you like:
Prompts you for the task you’re trying to focus on
Turns on a Focus Mode, to reduce notifications and distractions
Starts the Focused Work session of your choice, and provides it with the ‘task’ description you entered above
Plays a noise to focus by, using Dark Noise
Runs your Signal
Enables a ‘liveWorkSession’ key in Data Jar — we’ll use this in an upcoming entry to tell if we have an active work session
When you Add this Shortcut to your Mac, you’ll be prompted to select the Focus Mode, Focus Session, White Noise and Signal. This is where you’ll choose the Signal we just created, and any other parameters you want to use for each session, but if you’d like to select some of these parameters each time you run the Shortcut, you can simply leave them as they are. I do this for the Focused Work session, which lets me choose a different option depending on how much time I have available to work. It’s super convenient!

Once configured, be sure to test the Shortcut to make sure it does what you want — if this is the first time you’re running Shortcuts with these 3rd Party apps, it will ask you to grant permission to run them. From here, you can customize it however you need - get creative!
The Automation:
Shortcuts on the Mac gives you several ways to run this Shortcut, and you might be happy just to run it from the Shortcuts app directly, or from the Menu bar, but for me, having the Shortcut run when I press a button on my desk makes it more likely that I’ll remember to run it. It’s also way more satisfying :)
Open Signals for HomeKit again, and click the ‘New Automation’ button from the toolbar. Find the button you want to use to trigger the Shortcut, and click ‘Create Automation’.
On the Automation screen, click ‘Run Shortcut’, and select your new ‘Focus Time’ Shortcut from the list - I highly recommend clicking ‘Test Shortcut’ while you’re here, to make sure Signals for HomeKit has permission to run your Shortcuts.
Next, select the button configuration, and any other settings you want - I’ve selected a Single Press, and I’ve also put a time range on it, so it will only run this Shortcut between 5 AM and 7 PM. This Leaves the button available for me to use for another automation later in the evening.
And you’re done! Give the button a few presses, and then have some fun finding some other unique uses — don’t forget to let us know what you do!

A Note On Buttons:
A quick note on buttons — there are a few HomeKit buttons available on the market, but I’ve found that some of them are not as reliable as you would expect, sometimes requiring a few presses to wake up and register a click in HomeKit. I believe this is because they are almost entirely battery powered, and many of them will go into a sleep mode to preserve battery life — unfortunately, getting them to wake up seems like a challenge, much like my teenagers.
For my money, I highly recommend the Aqara Button — I have one attached to the underside of my desk, so it’s nicely hidden away. The Aqara works properly the first time, every time, and if you already have an Aqara hub, it’s extremely inexpensive. Even if you don’t yet have an Aqara hub, I recommend looking into them — I have their buttons, contact sensors, motion sensors and leak sensors, and their responsiveness and reliability is some of the best I’ve seen for HomeKit. Plus, their hubs are actually functional, adding a security system, camera, etc — not just a useless box that you stuff in a closet. I’ve been very impressed!
Ready to give it a try? Download Signals for HomeKit now!